PRINTER
SAVING AND USING PRINT FILES
Force retention/document filing
< 4 steps in all >
 Click the [Job Handling] tab.
 Click the [Retention] checkbox so that the checkmark
  Select how to save the print data in "Retention Settings".
To enter a password (5 to 8 digit number), click the [Password] checkbox so that the checkmark  appears.
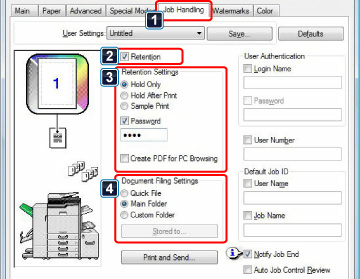
 Select the folder to store the file in "Document Filing Settings".
When you have selected [Custom Folder], click the [Stored to] button to select the folder.
- When [Quick File] is selected, "Retention Settings" will be set to [Hold After Print].
- When [Quick File] is selected, the password entered in "Retention Settings" is cleared.
- If necessary, you can select the data format from CMYK and RGB for data to be stored in the machine. Click the [Compatibility] button on the [Advanced] tab and select the format from "Rip Format".
- To store a file in a custom folder, you must first create the custom folder using [System Settings] in "Setting mode" → [Document Filing Control]. If you have set a password for the custom folder, enter the password in "Folder Password" on the folder selection screen.
- If you have configured to always use the force retention function in "Printing Policy" on the [Options] tab, you cannot clear the [Retention] checkbox.
- When your network is IPv6, files are stored in the main folder.
< 3 steps in all >
Select [Job Handling].
Click the [Retention] checkbox so that the checkmark
Select how to save the print data in "Retention Settings". After you have entered a password (a 5 to 8-digit number), click the  button to lock the password. This allows you to readily set the same password the next time you use it.
Select the folder to store the file in "Document Filing Settings".
When you have selected [Custom Folder], click the [Stored to] button to select the folder.

- When [Quick File] is selected, "Retention Settings" will be set to [Hold After Print].
- When [Quick File] is selected, the password entered in "Retention Settings" is cleared.
- If necessary, you can select the data format from CMYK and RGB for data to be stored in the machine. Select [Advanced] in [Printer Features] and select the format from "Rip Format".
- To store a file in a custom folder, you must first create the custom folder using [System Settings] in "Settings" → [Document Filing Control]. If you have set a password for the custom folder, enter the password in "Folder Password" on the folder selection screen.
- In Mac OS X 10.5 to 10.5.8 and 10.6 to 10.6.2, if you wish to store the document filing settings in a custom folder, click the [Custom Folder] tab.
- In Mac OS 9, select [Job Handling] and then select the retention setting. (The document filing function cannot be used.)