FAX
CHECKING THE IMAGE BEFORE PRINTING
< steps in all >
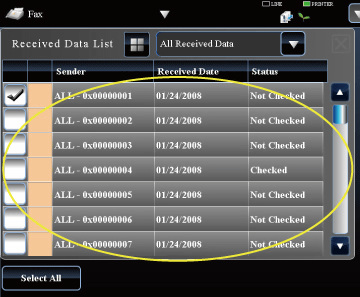
 When data is received, the [Received Data] icon appears at the top of the screen. Tap the icon.
If the next message appears while you are configuring settings of any type and you tap the [Received Data] icon, the settings that you are configuring will be canceled.
- Tapping the [Received Data] icon while [Received Data Image Check Setting] is disabled displays the confidential reception data file.
 Tap the key of the received data you wish to check, and tap the [Check Image] key on the action panel.
If you wish to forward or save data after selecting the image, also tap the [Check Image] key.
04056003.jpg
- To show thumbnails of the received images, tap the [Thumbnail] key.
- To delete a received image, tap the [Delete] key on the action panel.
- To forward the selected received image, tap the [Forward to Other Address] key. Specify the destination in the displayed address book screen, and forward the image.
- To save the selected received image, tap the [Save Data to Folder] key.
- To store the sender fax number as a number for "Allow/Reject Number Setting", tap the [Store to Unwanted Fax] key and, in the confirmation message screen, tap the [Store] key.
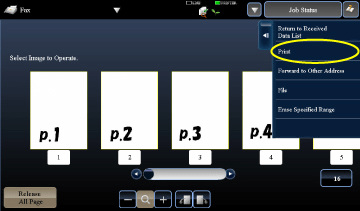
 Tap the image you wish to print to select, and tap the [Print] key on the action panel to print the image.
- [Select All Page]: Selects all displayed images.
- [Release All Page]: Cancels all images that have been selected by "Select All".
 /
/ : Use these keys to enlarge or reduce an image.
 /
/ : Rotates image counterclockwise or clockwise.
04056004.jpg
- A preview image is an image for the touch panel. It will differ from the actual print result.
- Tap the [Erase Specified Range] key to delete unwanted area of the image. Specify the image area you wish to delete in the Erase Specified Range screen.
- To forward the selected image, tap the [Forward] key.
- FORWARDING RECEIVED DATA MANUALLY
- To save the selected image, tap the [Save to HDD] key.
- SAVING RECEIVED DATA