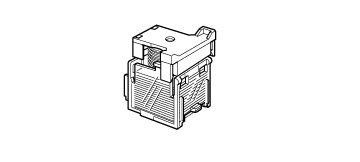
SADDLE FINISHER (LARGE STACKER)
Overview
This includes the offset function that
outputs sorted paper while staggering
each set of paper, the staple sort
function that staples each set of prints,
the saddle stitch function that
automatically staples the center of the
sheets and folds the sheets in half, and
the paper folding function that folds
paper in half.
To punch holes in printed paper, install an optional hole punch module.
To punch holes in printed paper, install an optional hole punch module.
Function names
Output trays (upper tray, lower tray)
Stapled and offset output is delivered to this tray.
The tray is slidable. Extend the tray for printing on large-size paper (12" x 18", 11" x 17", 8-1/2" x 14", 8-1/2" x 13", A3W, A3 and B4 sizes).
Stapled and offset output is delivered to this tray.
The tray is slidable. Extend the tray for printing on large-size paper (12" x 18", 11" x 17", 8-1/2" x 14", 8-1/2" x 13", A3W, A3 and B4 sizes).
Saddle stitch tray guide
This guides the output as it is delivered to the tray. Before printing, attach the saddle stitch tray guide in the appropriate position below for the paper size to be used.
This guides the output as it is delivered to the tray. Before printing, attach the saddle stitch tray guide in the appropriate position below for the paper size to be used.
Staple compiler
This temporarily stacks paper to be stapled.
This temporarily stacks paper to be stapled.
Saddle stitch tray
This guides the output as it is delivered to the tray. Before printing, attach the saddle stitch tray guide in the appropriate position below for the paper size to be used.
This guides the output as it is delivered to the tray. Before printing, attach the saddle stitch tray guide in the appropriate position below for the paper size to be used.
Top cover
Open this cover to remove a paper misfeed.
Open this cover to remove a paper misfeed.
Front cover
Open this cover to replace the staple cartridge, remove a staple jam, or remove a paper misfeed.
Open this cover to replace the staple cartridge, remove a staple jam, or remove a paper misfeed.
New.jpg)

- A paper pass unit is required to install a saddle finisher (large stacker) as well as a stand/1x500/2x500/2000 sheet paper drawer.
- Do not place heavy objects on the saddle finisher (large stacker) or press down on the saddle finisher (large stacker).
- Exercise caution when you turn on the power and when printing is taking place, as the tray may move up and down.
- A saddle finisher (large stacker) cannot be installed simultaneously with a finisher, finisher (large stacker) or saddle finisher.
Supplies
The saddle finisher (large stacker) requires the following staple cartridge:
_staple.jpg)
Finisher unit
Staple cartridge (approx. 5000 staples per cartridge x three cartridges) AR-SC2Saddle stitch unit
Staple cartridge (approx. 2000 staples per cartridge x three cartridges) AR-SC3Saddle finisher (large stacker) maintenance
When the staple cartridge runs out of staples, a message will appear in the operation
panel. Follow the operation procedure to replace the staple cartridge.
panel. Follow the operation procedure to replace the staple cartridge.
Operation
Replacing the staple cartridge (finisher unit)Replacing the staple cartridge (saddle stitch unit)
Replacing the staple cartridge (finisher unit)
 Open the front cover.
 -cover_open.jpg)
 Squeeze the green parts of the staple case and pull the case up and then out.
_staple-case_out.jpg)
 Remove the empty staple cartridge.
Press the lock button to release the staple case cover and then remove the staple cartridge.
When staples remain, the staple cartridge cannot be removed.
When staples remain, the staple cartridge cannot be removed._staple_out.jpg)
 Insert a new staple cartridge into the staple case.
Push the staple cartridge in until it clicks into place.
Do not remove the seal from the cartridge before inserting the cartridge into the case.
Do not remove the seal from the cartridge before inserting the cartridge into the case._staple_set.jpg)
 Pull the seal that holds the staples straight out.
_staple-seal_pull.jpg)
 Push the staple case firmly back in.
Push the staple case in until it clicks into place.
_staple-case_insert.jpg)
 Close the front cover.
-cover_close.jpg)
 Make a proof copy in staple sort function to verify that stapling takes place correctly.
Replacing the staple cartridge (saddle stitch unit)
Before starting this procedure, remove all output from the output tray of the saddle finisher (large stacker). Do not replace removed output back in the output tray. Open the front cover. Grasp the handle on the saddle stitch unit and pull it slowly out until it stops.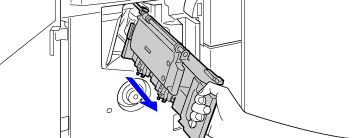 Pull the staple unit in the saddle stitch unit out and then rotate it up.
 Grasp the left and right side of each empty staple cartridge and remove the cartridges.
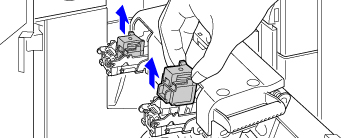 Load new staple cartridges.
Replace both staple cartridges. Remove the cover from each staple cartridge and then install the cartridge.
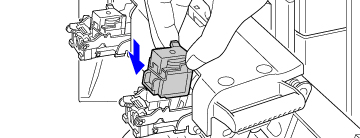 Pull the staple unit of the saddle finisher forward and then rotate it back to its original position.
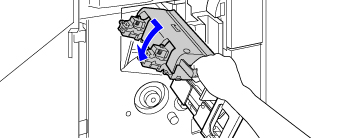 Push the saddle stitch unit in.
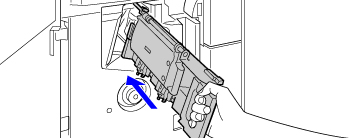
 Close the front cover of the saddle finisher.Make a test print or copy using the saddle stitch function to verify that stapling takes place correctly.