SAVING RECEIVED DATA
Overview
You can save received data in the document filing folder.

 This function is enabled if [System Settings] → [Operation Settings] → [Preview Setting] are selected in "Setting mode (administrator)" and if [Received Data Image Check Setting] is enabled.
Operation
When data is received,  is shown at the top of the screen.

In the System Information, tap the [Event Information] tab and tap the [Check Fax Reception Image] key
The received data is listed. You can also display the received data list by tapping the job status display and tapping the [Check Received Data] key on the action panel of Job Status screen.
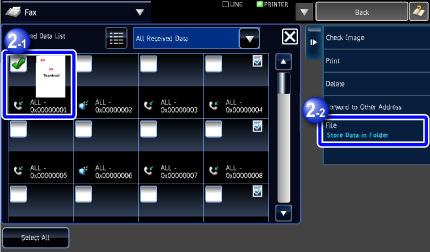
Tap the key of the received data you wish to save, and tap the [File] key on the action panel
- Tap
 to show a list of received data. The list view or thumbnails view can be changed depending on the setting mode.
 - Multiple sets of received data can be selected.
- When you select a single received data only, you can tap the [Check Image] key on the action panel and check the image on the preview screen.
- To store the sender fax number as a number for "Allow/Reject Number Setting", tap the [Store to Unwanted Fax] key and, in the confirmation message screen, tap the [Store] key.
Specify a sender fax number as a number for "Allow/Reject Number Setting" by selecting, in "Setting mode (administrator)", select [System Settings] → [Image Send Settings] → [Fax Settings] → [Receive Settings] → [Allow/Reject Number Setting].
- Tap

Set the file information, and tap the [Save] key