ENTER A DESTINATION MANUALLY
Overview
In Scan to E-mail modes, you can directly enter a destination to specify it. In Scan to Network Folder mode, you can directly specify a reference.
 For Scan to FTP, you cannot manually enter a destination.
Operation

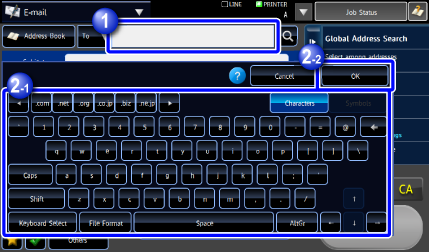
Tap Address text box
- In data entry mode, select the mode of the destination, and enter the destination address.
- If you tap Address text box in Scan to FTP, the address book screen appears.


Use the soft keyboard to enter a destination address
- For Scan to Network Folder mode, the network folder entry screen appears. See "Specifying a network folder as an address".
- After entering the destination address, tap the [OK] key.
 To switch among [To], [Cc] and [Bcc], tap
  .
.
You can select [Bcc] if [System Settings] → [Image Send Settings] → [Scan Settings] → [Scan Settings] → [Bcc Setting] are selected and if [Enable Bcc] is enabled.
Specifying a network folder as an address

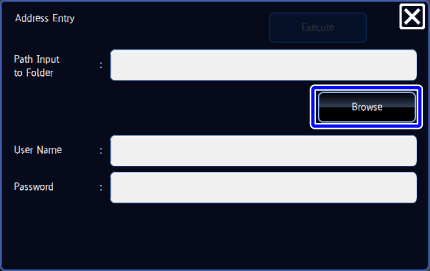
Tap the [Browse] key
- To directly enter an address, tap the [Path Input to Folder] entry box. The soft keyboard is displayed.
- If a user name and password are required, check with your server administrator and enter them.


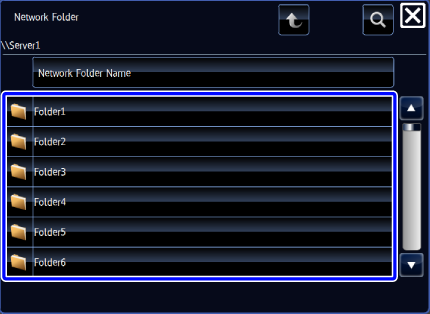
Tap the key of the workgroup that you wish to access

- Tap
 and enter a keyword to search for a workgroup, server, or network folder.
 - Up to 100 workgroups, 100 servers, and 100 network folders are displayed.
- Tap
 to return to the screen of step 1.
- Tap

Tap the key of the server or computer that you wish to access
If a screen appears prompting you to enter a user name and password, check with your server administrator and enter the appropriate user name and password.
Tap the key of the network folder
After the settings are completed, tap the [Enter] key. You will return to the screen of step 1. Tap the [Enter] key again to accept the destination.