LOADING PAPER INTO THE BYPASS TRAY
Overview
Use the bypass tray for printing on plain paper, envelopes, label sheets, tab paper, and other special media.
Up to 100 sheets of paper can be loaded (Heavy paper weighing between 28 lbs and 140 lbs: 40 sheets, heavy paper weighing between 140 lbs and 110 lbs: 20 sheets) for continuous printing, just like operation using other trays.
Up to 100 sheets of paper can be loaded (Heavy paper weighing between 28 lbs and 140 lbs: 40 sheets, heavy paper weighing between 140 lbs and 110 lbs: 20 sheets) for continuous printing, just like operation using other trays.

- When using plain paper other than Sharp standard paper or special media other than SHARP-recommended transparency film, or when printing on the reverse side of paper that has been printed on one side, load paper one sheet at a time. Loading more than one sheet at a time will cause misfeeds.
- Before loading paper, straighten any curling in the paper.
- When adding paper, remove any paper remaining in the bypass tray, combine it with the paper to be added, and reload as a single stack. If paper is added without removing the remaining paper, a misfeed may result.
How to place the original
Load paper up to 7-1/4" x 10-1/2" (A5) size in landscape orientation.
Loading tab paper
To print on tab paper, load tab paper into the bypass tray with the print side facing down.
- Use only tab paper that is made of paper. Tab paper made of a material other than paper (film, etc.) cannot be used.
- To print on the tabs of tab paper:
In copy mode, use [Tab Copy] in "Others". In print mode, use the tab print function.
Inserting transparency film
- Use SHARP-recommended transparency film.
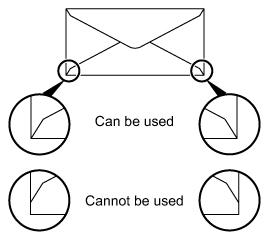
When inserting transparency film into the bypass tray, the rounded corner should be at the front left when the film is placed in the landscape orientation, or at the far left when the film is oriented in the portrait orientation. - When loading multiple sheets of transparency film into the bypass tray, fan the sheets several times before loading.
- When printing on transparency film, remove each sheet as it is printed and output from the machine. Allowing sheets to stack in the output tray may result in curling.
Loading envelopes
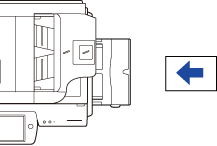
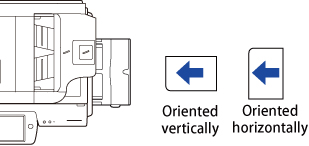
When inserting envelopes in the bypass tray, place them aligned to the left side in the orientation shown below.
Loading envelopes Only the front side of envelopes can be printed or copied on. Place the front side facing down. |
 |
Important points when using envelopes
- Do not print on both sides of an envelope. This may result in misfeeds or poor print quality.
- Restrictions apply to some types of envelopes. For more information, consult a qualified service technician.
- Some operating environments may cause creasing, smudging, misfeeds, poor toner fusing, or machine failure.
- Do not use the following envelopes:
- Those with a metal piece, a plastic hook or a ribbon hook
- Those with a string for closing
- Those with a window
- Those with a lining
- Those with an uneven surface, finished with titling or emboss
- Duplex envelopes or those with adhesive or other synthetic material for sealing
- Hand-made envelopes
- Those containing air inside
- Those damaged with a crease, fold mark or tear
- Envelopes with the corner gluing position on the back not aligned with the corner edge should not be used as it may cause creasing.
- Print quality is not guaranteed in the area 13/32" (10 mm) around the edges of the envelope.
- Print quality is not guaranteed on parts of envelopes where there is a large step-like change of thickness, such as on four-layer parts or parts less than three layers.
- Print quality is not guaranteed on envelopes having peel off flaps for sealing the envelopes.
Important points when using embossed paper/label sheets
- The effect of asperity surfaces of embossed paper may affect the print quality depending on the type of embossed paper.
For more information, consult the dealer or "SHARP Service Department". - Some labels may have to be loaded into the bypass tray in the specified orientation. Follow such instructions. If a form is already printed on the labels, and the print images and the preprinted form do not line up, adjust the application or printer driver settings to rotate the print images.
Operation
 Open the bypass tray.
  Do not place heavy objects on the bypass tray or press down on the tray.
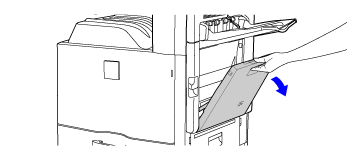
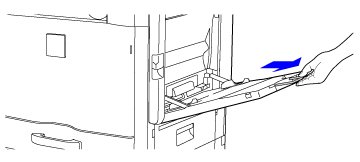
When loading paper larger than 8-1/2" x 11"R or A4R, pull out the extension guide.
Pull the extension guide all the way out.
Pull the extension guide all the way out.
 Set the bypass tray guides to the width of the paper.
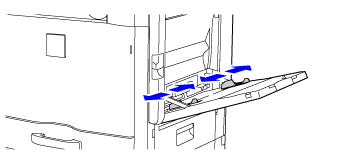
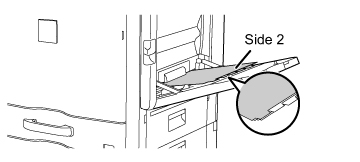
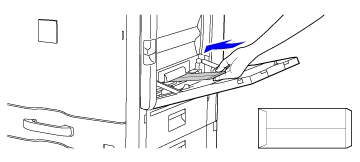
 Load the paper with the print side facing down.
 Insert the paper along the bypass tray guides all the way into the bypass tray until it stops.
For "Letter Head" and "Pre-Printed", set the paper with the print side up. However, when [Disabling of Duplex] is enabled, set the print side in the same orientation as in the regular mode (facing down). 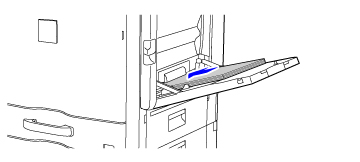

- Do not force the paper in.
- If the bypass tray guides are set wider than the paper, move the bypass tray guides in until they correctly fit the width of the paper. If the bypass guides are set too wide, the paper may skew or be creased.
Fusing unit pressure adjusting levers
In some cases damage to the envelopes or smudging may occur even if envelopes within the specifications are used.
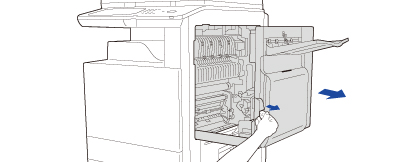
This problem may be alleviated by shifting the fusing unit pressure adjusting levers from their "normal pressure position" to the "lower pressure position". Follow the procedure on the this page.
Pull out the right side cover.While pushing up the open/close lever on the right side cover, gently open the cover.
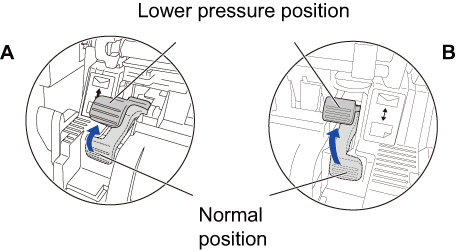
 Move the fusing unit pressure adjusting levers (two) to the lower pressure position as shown.
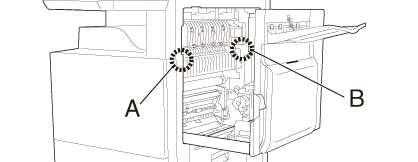
 Close the right side cover.
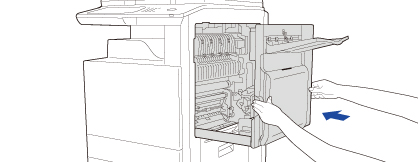
 Return the lever to the normal position when finished feeding envelopes.
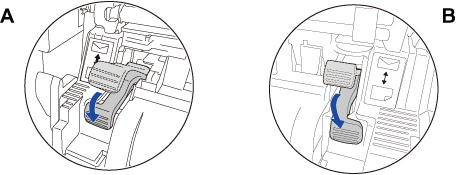
 The fusing unit is hot. Take care not to burn yourself when operating the fusing unit pressure adjusting levers.Be sure to return the levers to the "normal pressure position" before printing or copying on paper other than envelopes. Otherwise, fusing problems, paper misfeeds, or equipment failure may occur.