PREVIEW SCREEN
Overview
In the preview screen, you can view output images or images stored in the machine using the touch panel.

Keys used in the preview screen
| This changes the mode to edit mode. Pages of the original can be changed, rotated, or deleted. | |
| This reduces the image. | |
| This displays the scroll bar for enlargement/reduction operations. Moving the slider to the left reduces the image, and moving the slider to the right enlarges the image. | |
| This enlarges the image. | |
| This rotates the preview image of whole page in the arrow's direction. The printing result is not rotated. | |
| This displays preview images of respective pages. | |
This displays thumbnails of preview images. |
|
| This displays pages in a 3D view. |

- The display position of an image can be moved by dragging it while it is enlarged.
- To enlarge an image, double-tap it when the preview image is displayed by page.
Operation
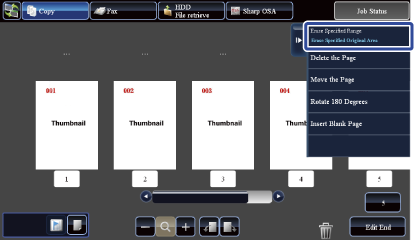
Deleting a page

In the preview screen, tap
 to switch to edit mode
Tap the page you want to delete
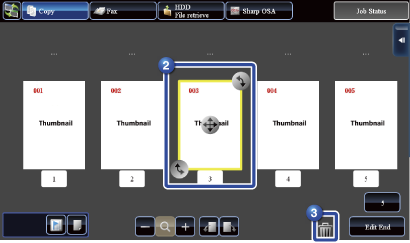

Tap

- You can also delete the page by tapping the [Delete the Page] key on the action panel.
You can also delete by dragging a page to.

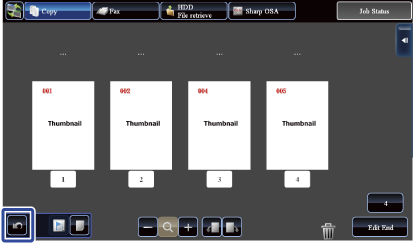
- To undo the deletion, tap
 . To redo the deletion, tap
  .
.
- You can also delete the page by tapping the [Delete the Page] key on the action panel.

Tap the [Edit End] key
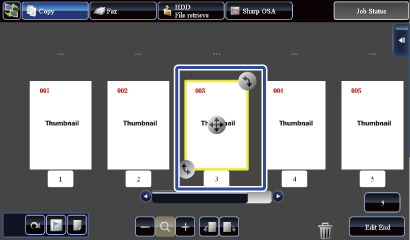
Moving a page
-
In the preview screen, tap
to switch to edit mode -
Tap the page you want to move

-
Drag
 to move the page You can also move the page by tapping the [Move the Page] key on the action panel and then tapping
  of the destination.
 -
Tap the [Edit End] key
Rotating a page 180 degrees
-
In the preview screen, tap
to switch to edit mode -
Tap the page you want to rotate
-
Drag
 or
or  to rotate the page You can also rotate the page by tapping the [Rotate 180 Degrees] key on the action panel.
 -
Tap the [Edit End] key
Setting chapter inserts
When Multi Shot or 2-Sided is specified, you can move a page marked with  to the first page.
-
In the preview screen, tap
to switch to edit mode -
Tap the page you want to move

-
Tap
 is displayed on the page.
 You can also set chapter inserts by tapping the [Specify Chapter Inserts] key on the action panel.
To cancel the Chapter Inserts setting:
Tap displayed on the page, or select the page and tap the [Cancel Chapter Inserts of Selected Page.] key on the action panel. -
Tap the [Edit End] key
Inserting a blank page
-
In the preview screen, tap
to switch to edit mode -
Tap
 You can also insert a blank page by tapping the [Insert Blank Page] key on the action panel.
 -
Tap
for the location into which you want to insert a blank page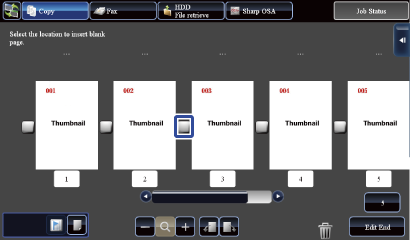
-
Tap the [Edit End] key
Deleting part of the original image
-
In the preview screen, tap
to switch to edit mode -
Tap the [Erase Specified Range] key on the action panel
-
Follow the on-screen instructions to specify the erase range
Specify the erase range and then tap the [Execute] key.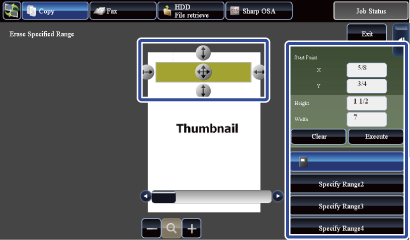 To delete the image outside the selected range, tap the [Reverse Erase Range] key on the action panel.
 -
On the action panel, select [Apply This Erase Position to All Pages.] or [Apply This Erase Position to This Page.]


As necessary, repeat the steps to specify the erase range and the pages to which it is applied

Tap the [Exit] key

Changing the settings
Tapping the tab on the left of the screen allows you to change the color mode and other settings.
You cannot tap the keys for functions whose settings cannot be changed.
You cannot tap the keys for functions whose settings cannot be changed.
