TRAY 1/2
Overview
A maximum of 1,250 sheets of 8-1/2" × 11" (A4) paper can be loaded into tray 1.
A maximum of 850 sheets of 8-1/2" × 11" (A4) paper can be loaded into tray 2.
A maximum of 850 sheets of 8-1/2" × 11" (A4) paper can be loaded into tray 2.
 If you loaded paper of a different type or size from the paper previously loaded, be sure to check the settings in "Setting mode". An incorrect setting may cause print failure, printing on paper of an incorrect size, or type or paper misfeeds.
To check the type and size of paper:
In "Setting mode", select [System Settings] → [Paper Tray Settings]. Do not place heavy objects on the tray or press down on the tray.
Operation
Loading paper

Pull out the paper tray
Gently pull the tray out until it stops. Keep holding the handle until the lock is released.

Lift the feed roller, and place paper into the tray
Load the paper with the print side facing up. The stack must not be higher than the indicator line (maximum of 1,250 sheets for tray 1, or maximum of 850 sheets for tray 2). Fan the paper well before loading it. If the paper is not fanned, multiple sheets may feed at once and cause a misfeed.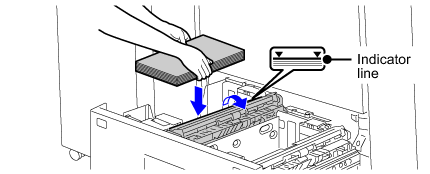


Lower the feed roller, and gently push the paper tray into the machine
Push the tray firmly all the way into the machine.
Changing the paper size
-
Remove the paper size guide
With the base of the tray pressed all the way down, hold down the hook at the bottom on the paper size guide and pull the paper size guide up slightly. Before changing the paper size of tray 2, raise the paper guide.
 -
Attach the paper size guide and transparent sheet appropriately for the size of paper to be used
(1) Align the bottom of the paper size guide with the appropriate slot on the base of the tray.
Align the paper size guide with the slot for the paper size to be used (indicated by the paper size mark).(2) Align the holes at the top of the paper size guide with the protrusions that secure the paper size guide.
Align with the holes for the paper size to be used (indicated by the paper size mark).(3) Push in the paper guide so that it locks into place.
Push the paper size guide in until the hook at the bottom locks into place. (You will hear a "click" when the hook locks.) Move the paper size guide slightly to verify that it has locked into place.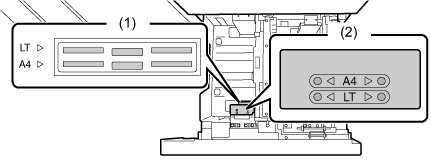

- When attaching the paper size guide, place the transparent sheet in direct contact with the base of the tray in the correct orientation as shown.
- The slot or hole with the "LT" mark is for 8-1/2" x 11" size.
When attaching the paper size guide, make sure that the top and bottom of the guide are aligned to the same paper size. If the top and bottom of the paper size guide are not aligned to the same paper size, skewed feeding and misfeeds will result. -
Repeat steps 1 and 2 to adjust the far paper guide to the paper size to be used.
Be sure to adjust the far paper guide to the same size as the near paper guide.
When removing and attaching the far paper size guide, take care not to hit the front cover of the machine.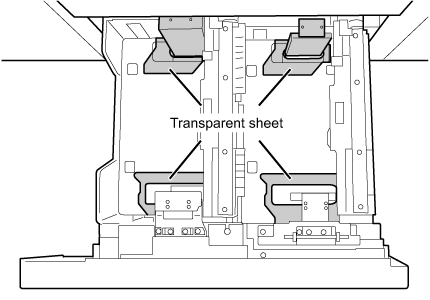 Adjusting only one paper guide may result in skewed feeding or misfeeds.
Set the paper size and paper type
Be sure to set the paper size and paper type by selecting [System Settings] in "Setting mode" → [Paper Tray Settings].
If the paper size setting is not configured correctly, automatic paper selection will not operate correctly and printing may take place on the wrong size or type of paper or a misfeed may occur.