SADDLE STITCHING FOR SORTED COPIES
Overview
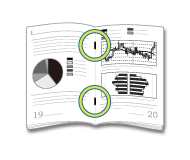
This function staples each set of copies at two positions in the center of paper, folds them in half, and outputs them. For saddle folding, it trims a side drop, offering a good-looking output image.

- You can view staple positions in "COPY PREVIEW".
- A saddle finisher is required to use the saddle stitch function.
- The trimmer function is available when a trimmer unit is installed on the machine.
Operation
Saddle stitch

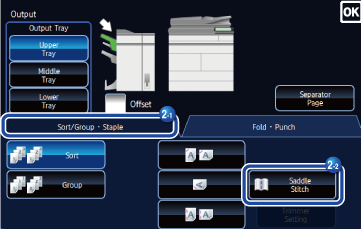
Tap the [Output] key

Tap the [Sort/Group・Staple] tab, and tap the [Saddle Stitch] key

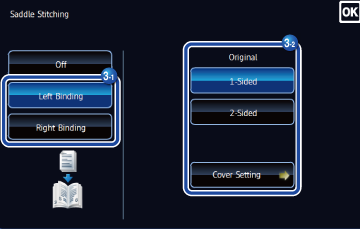
Tap the [Left Binding] or [Right Binding] key to select an original and configure the cover sheet setting
After the settings are completed, tap .
. If the number of scanned originals exceeds the staple sheet limit, a message is displayed. Tap the [Divide], [Continue], or [Cancel] key.
[Divide]: Divides the pages into sets that can be stapled and sorts them. You cannot use this function if the cover settings are selected.
[Continue]: Continues sorting without stapling.
[Cancel]: Cancels the staple sort setting.
To cancel the Saddle Stitch:
Tap the [Off] key.
Trimmer Setting
-
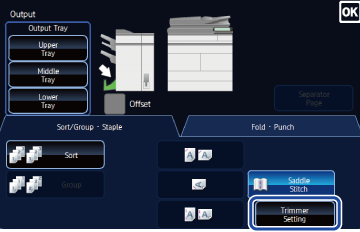
When Saddle Stitch is selected, tap the [Trimmer Setting] key
-
Tap the [On] key, and specify the trimming width
Tap the numeric value display field of the trimming width, and enter the allowable range using the numeric keys. Otherwise, tap .
.
After the settings are completed, tap.
To cancel the Trimmer Setting:
Tap the [Off] key.