COPYING
ERASING PERIPHERAL SHADOWS FOR COPYING
Erase
< steps in all >
 Place the original and tap the [Preview] key.
Place the original in the document feeder tray of the automatic document feeder, or on the document glass.
 Tap the [Others>>] key, and tap the [Erase] key.
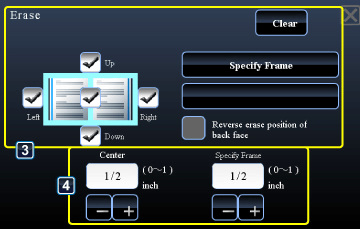
 Tap the checkbox of the edge that you wish to erase, and specify the erase position.
Check that he tapped checkbox is set to  .
.
If the [Specify Frame] key is tapped, the [Up], [Down], [Left], and [Right] checkboxes are set to .
.
If the [Specify Frame+Center] key is tapped, all the checkboxes are set to .
.
If the [Specify Frame] key is tapped, the [Up], [Down], [Left], and [Right] checkboxes are set to
If the [Specify Frame+Center] key is tapped, all the checkboxes are set to

02024001.jpg
Specify the erase edge on the reverse side when erasing edges of one to three sides of Up, Down, Left, and Right on the front side to scan a 2-sided original.
- If the [Reverse erase position of back face.] checkbox is set to
 , the edge in the position opposite to the erased edge on the front side will be erased.
 - If the [Reverse erase position of back face.] checkbox is set to
 , the edge in the same position as on the front side will be erased.
 Specify the erase width.
- Tap the numeric value display indicating the margin shift area on the front side or reverse side, and enter the area using the numeric keys.
- To quickly set the area, first specify a value close to the desired value by the numeric keys, then adjust it with
 .
.
After the settings are completed, tap  and [<<Back] keys in sequence.
To cancel the erase setting:
Tap the [Clear] key.
 Check the preview image in the preview screen.
Check whether or not settings produce the required results.
To cancel all settings:
Tap the [CA] key.
Tap the [CA] key.
 Tap the [Color Start] or [B/W Start] key to start copying.
When making only one set of copies, you do not need to specify the number of copies.
