CHECKING THE IMAGE BEFORE PRINTING
Overview
You can check the image of received data on the touch panel before printing.

- Depending on the size of the received data, part of the check image on the touch panel may not appear.
- The received data list can also be shown in the job status screen that appears when you tap the job status display.
- The received data can be forwarded, deleted, or saved from the received data list.

To check received data before printing:
In "Setting mode (administrator)", select [System Settings] → [Operation Settings] → [Preview Setting], and enable [Received Data Image Check Setting].Operation
When data is received,  is shown at the top of the screen.

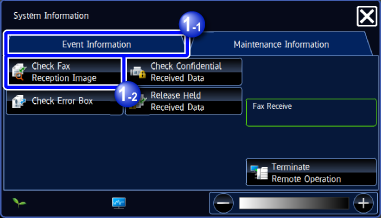
In the System Information, select the [Event Information] tab and tap the [Check Fax Reception Image] key
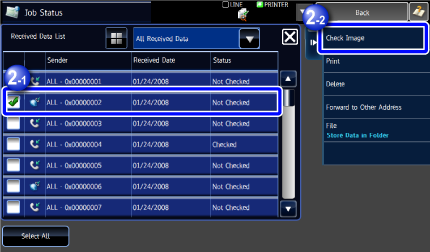
The received data is listed.
 You can also display the received data list by tapping the job status display and tapping the [Check Received Data] key on the action panel of Job Status screen.
Tap the key of the received data you wish to check, and tap the [Check Image] key on the action panel
Displays the received data image.

- Tap
 to show thumbnails of received images(Thumbnail screen). The list view or thumbnails view can be changed depending on the setting mode.
 - To delete a received image, tap the [Delete] key on the action panel.
- To transfer the selected received image, tap the [Forward to Other Destination] key.
- To save the selected received image, tap the [File] key.
- Tap

Tap the image you wish to print, and tap the [Print] key on the action panel
The machine starts printing the image.
- [Select All]: Selects all displayed images.
- [Release All Page]: Cancels all images that have been selected by "Select All".
 /
/ : Use these keys to enlarge or reduce an image.
 /
/ : Rotates image counterclockwise or clockwise.

- A preview image is an image for the touch panel. It will differ from the actual print result.
- Tap the [Erase Specified Range] key to delete unwanted area of the image. Specify the image area you wish to delete in the Erase Specified Range screen.
- To forward the selected image, tap the [Forward to Other Address] key.
- To save the selected image, tap the [File] key.