USING A BILLING CODE
Overview
If the use of billing code is enabled in "Setting Mode (Administrator", the billing code entry window is displayed at the time of mode transition (at the time of printing/sending in document filing mode).
Enter the main code or sub code as required.
Enter the main code or sub code as required.

- To enable the billing code
Select "Setting Mode (Administrator)" - [Billing Code Setting] - [Administration Settings], then set [Use Billing Code] to [Enable]. - To retain the specified billing code at the time of mode transition
Select "Setting Mode (Administrator)" - [Billing Code Setting] - [Administration Settings], then set the [Take Over Billing Code at Mode Transition] check box to_S.jpg) . This eliminates the need to enter billing codes at each mode transition.
. This eliminates the need to enter billing codes at each mode transition.
 You can assign billing codes to reprinting/resending of target files and sending of print jobs from "Setting Mode (Web version)" - [Document Operations].
Specifying a billing code again
To change the specified billing code to another one, tap the [Switch Billing Code.] key on the action panel.
When the billing code entry window is displayed, select a new billing code.
When the billing code entry window is displayed, select a new billing code.
Operation
Select a billing code from the list
Select the desired billing code from the list of registered billing codes.
You need to register billing codes in advance.
You need to register billing codes in advance.

When the billing code entry window is displayed, tap the [Select from List] key of the main code.

 When not specifying a billing code
Tap the [No Use of Billing Code] key.To select the previously used billing code (at the time of user authentication)
Tap the [Use Previously-Used Billing Code.] key on the action panel at the time of user authentication; this displays the main code and sub code the authenticated user has entered previously.
Tap and select the main code from the list
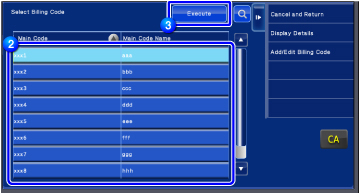 To search for the main code or main code name
Tap . When the search window is displayed, enter the main code and main code name, then tap the [Start Search] key. The search result list is displayed.
Tap the [Enter] key
Returns the screen to the billing code entry window.To cancel the selection from the list
Tap the [Cancel and Return] key on the action panel. This cancels the selected main code and returns the screen to the billing code entry window.To check the details of the main code
Tap the [Display Details] key on the action panel. The detail window is displayed. Check the details, then tap .
.
Tap the [Select from List] key of the sub code.
The sub code list is displayed. Perform the procedure shown in steps 2 and 3, then specify the sub code.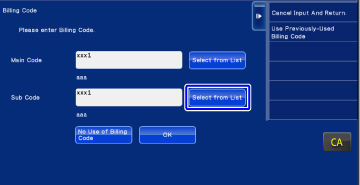

Tap the [OK] key
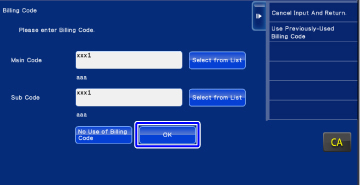 To clear the value of the specified billing code
Tap the [CA] key. Enter the billing code again.
Directly entering a billing code
-
When the billing code entry window is displayed, tap the text box in [Main Code], then enter the main code.
Specify the code using up to 32 single-byte characters.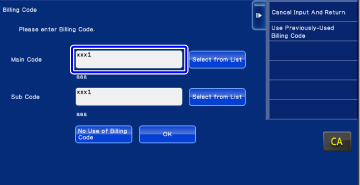 When not specifying a billing code
Tap the [No Use of Billing Code] key. The use code is set to the main code. -
Tap the text box of [Sub Code], then enter the sub code.
Specify the code using up to 32 single-byte characters.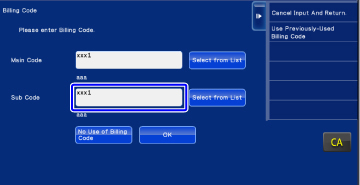
-
Tap the [OK] key
To clear the value of the specified billing code
Tap the [CA] key. Enter the billing code again.