ADDING A REGISTERED IMAGE TO AN ORIGINAL(CUSTOM IMAGE)
Overview
This function adds an image registered in the machine to an original to make a copy.
There are following two types of custom images.
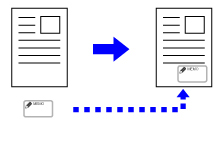
- Custom stamp
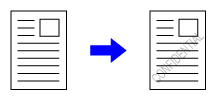
- Custom watermark (Stamp image with gray-scale watermark)

- An image must be registered in advance from the printer driver to the machine.
For information about how to register an image, see "REGISTERING A CUSTOM IMAGE""REGISTERING A CUSTOM IMAGE" (User's Manual)". - A custom stamp image is copied by sheet, not by original. If 2in1, 4in1 is enabled, user stamps are copied for each set of pages.
- A custom stamp image is copied with the registered size. The size remains unchanged even when the copy ratio is enlarged or reduced.
- A different custom image cannot be specified for each page.
- If an image runs off of the specified paper depending on the registered size or position, the excess will not be copied.
Custom Image can be combined with Tandem Copy.Stamp copy is performed when a custom image with the same file name is registered in both the master and slave machines.
If it is not registered, a copy will be made without a custom image.
The combination with other functions is described in the table below.
| Combined function | Custom image operations |
|---|---|
| Margin Shift | Shifts in the same way as for an original image. |
| Erase | Makes a stamp copy as normal. |
| Dual Page Copy | Makes a stamp copy by sheet. |
| Pamphlet Copy | Makes a stamp copy as normal. |
| Job Build | Makes a stamp copy as normal. |
| Covers/Inserts | Based on the custom image setting. |
| Transparency Inserts | Makes a stamp copy as normal. |
| 2in1 | Makes a stamp copy by sheet. |
| Book Copy | Makes a stamp copy as normal. |
| Tab Copy | Makes a stamp copy as normal regardless of image shift setting. |
| Card Shot | Makes a stamp copy by sheet. |
| Mirror Image | Makes a stamp copy as normal without mirror image reverse. |
| B/W Reverse | Prints an image as normal without B/W reverse. However, the following condition is set when printed on a dark background. Custom stamp: Printed in white Custom watermark: Printed without being whitened |
| Full Bleed Copy | Makes a stamp copy as normal. |
| Centering | Makes a stamp copy as normal without centering. |
| Stamp | Makes a stamp copy on the Stamp menu. |
| Photo Repeat | Cannot be combined. |
| Multi-Page Enlargement | Cannot be combined. |
| Pattern Print | Makes a stamp copy under a pattern print. |
| Repeat Layout | Cannot be combined. |
| Position Image | Prints an image at the original position regardless of the Position Image setting. |
| Book Divide | Makes a stamp copy by sheet. |
Operation
 Place the original and tap the [Preview] key.
Place the original in the document feeder tray of the automatic document feeder, or on the document glass.
 Tap the [Others] key, and tap the [Custom Image] key.
  Tap the [Custom Stamp] or [Custom Watermark] key.
  Tap the [Image] key to select an image.
Select the required thumbnail image(s) from the available selection.
 Set [Print Page] or [Original].
For custom stamp
For custom watermark
| Print Page | Specify a page(s) for stamp copy. First Page or All Pages | |
| Print Position | Specify a position for stamp copy. | |
| Originals | ORIGINAL PLACEMENT ORIENTATION | Specify the original orientation. |
| 2-Sided Original Type | Specify the binding edge for 2-sided original. Book or Tablet | |
| Angle | Specify the corner of the image. 0 degrees, -90 degrees, 90 degrees, or 180 degrees | |
| Print Pattern | Specify the image watermark print pattern. Transparent: Makes an original image transparent for stamp copy. Overlap: Hides a watermark added to an original image for stamp copy. |
|
| Exposure | Select the exposure of a watermark from nine levels. | |
| Print Page | Specify a page(s) for stamp copy. First Page or All Pages |
|
| Print Position | Specify a position for stamp copy. | |
| Originals | ORIGINAL PLACEMENT ORIENTATION | Specify the original orientation. |
| 2-Sided Original Type | Specify the binding edge for 2-sided original. Book or Tablet | |
| Angle | Specify the corner of the image. 0 degrees, -90 degrees, 90 degrees, or 180 degrees | |
After the settings are completed, tap  and [Back] keys in sequence.
To cancel the Custom Image setting:Tap the [Off] key.
 Check the preview image in the preview screen.
Check whether or not settings produce the required results.
 To cancel all settings:
Tap the [CA] key.
 Tap the [Start] key to start copying.
When making only one set of copies, you do not need to specify the number of copies.
To make two or more sets of copies:
Tap the copies entry key to specify the number of copies.