DEVICE CONTROL
Device Control
Various devices mounted on the machine can be set.
ORIGINAL SIZE DETECTOR SETTING
One of the 8 groups of standard original sizes shown below can be selected for detection by the original size detection function.
| Selections | Detectable original sizes | |
|---|---|---|
| DOCUMENT GLASS | Document feeder tray (automatic document feeder) | |
| Inch-1 | 11" × 17", 8-1/2" × 14", 8-1/2" × 11", 8-1/2" × 11"R, 5-1/2" × 8-1/2" | 11" × 17", 8-1/2" × 14", 8-1/2" × 11", 8-1/2" × 11"R, 5-1/2" × 8-1/2", A3, A4 |
| Inch-2 | 11" × 17", 216 mm × 330 mm (8-1/2" × 13"), 8-1/2" × 11", 8-1/2" × 11"R, 5-1/2" × 8-1/2" | 11" × 17", 216 mm × 330 mm (8-1/2" × 13"), 8-1/2" × 11", 8-1/2" × 11"R, 5-1/2" × 8-1/2", A3, A4 |
| Inch-3 | 11" × 17", 8-1/2" × 13-2/5" (216 mm × 340 mm), 8-1/2" × 11", 8-1/2" × 11"R, 5-1/2" × 8-1/2" | 11" × 17", 8-1/2" × 13-2/5 (216 mm × 340 mm), 8-1/2" × 11", 8-1/2" × 11"R, 5-1/2" × 8-1/2", A3, A4 |
| AB-1 | A3, A4, A4R, A5, B4, B5, B5R | 11" × 17", 8-1/2" × 14", 8-1/2" × 11", A3, A4, A4R, A5, B4, B5, B5R |
| AB-2 | A3, A4, A4R, A5, B5, B5R, 216 mm × 330 mm (8-1/2" × 13") | A3, A4, A4R, A5, B4, B5, B5R, 11" × 17", 8-1/2" × 11", 216 mm × 330 mm (8-1/2" × 13") |
| AB-3 | A4, A4R, A5, B4, 8K, 16K, 16KR | A3, A4, A4R, A5, B4, 11" × 17", 8-1/2" × 11", 216 mm × 330 mm (8-1/2" × 13"), 8K, 16K, 16KR |
| AB-4 | 216 mm × 340 mm (8-1/2" × 13-2/5"), A3, A4, A4R, A5, B5, B5R | A3, A4, A4R, A5, B4, B5, B5R, 11" × 17", 8-1/2" × 11", 216 mm × 340 mm (8-1/2" × 13-2/5") |
| AB-5 | 216 mm × 343 mm (8-1/2" × 13-1/2"), A3, A4, A4R, A5, B5, B5R | A3, A4, A4R, A5, B4, B5, B5R, 11" × 17", 8-1/2" × 11", 216 mm × 343 mm (8-1/2" × 13-1/2") |
Cancel Detection at Document Glass
Original size detection on the document glass can be disabled. When this is done, all originals placed on the document glass are treated as special size originals.Disabling of devices/Staple setting
 Setup items may not be displayed depending on which peripherals are installed on this machine.
Disabling of Document Feeder
Use this setting to prohibit the use of the automatic document feeder, such as when the feeder malfunctions. (When the setting is enabled, scanning is still possible using the document glass.)Original Feeding Mode
The following original feeding modes can be set to operate by default in copy, image send, scan to HDD, and saved in external memory device modes. When a mode is frequently used, this saves you from having to select the mode in another mode each time you need to use it.- Mixed Size Original (Same Width (Copy mode only)/Different Width)
- Slow scan mode
- Blank Page Skip*
Disabling of Duplex
This is used to disable 2-sided printing, such as when the duplex module malfunctions.Disabling of Large Capacity Cassette
This setting is used to prohibit the use of the large capacity tray, such as when it malfunctions.Disabling of Tray Settings
This setting is used to prohibit tray settings (except for the bypass tray).Disabling of Bypass-Tray
Disables use of the bypass tray.Disabling of Inserter
Disables use of the inserter.Disabling of Offset
Disables use of the offset tray.Disabling of Stapler
This setting is used to prohibit use of the stapler, such as when the stapler of the finisher or saddle finisher malfunctions.Automatic Saddle Stitch
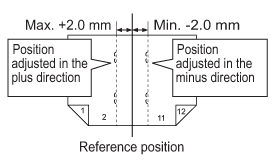
Saddle stitch stapling take place automatically when the pamphlet copy function is used.Fold Position Adjustment for Saddle Stitch/Saddle Fold
This setting is used to adjust both the fold and staple positions when a saddle finisher (100-sheet stapling) is installed and the saddle stitch function is used.Specify a value within +/- 2.0 mm in increments of 0.25 mm.
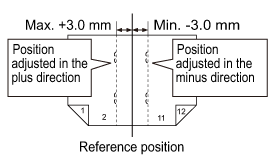
Staple Position Fine Adjustment for Saddle Stitch
This setting is used to adjust the staple position when a saddle finisher (100-sheet stapling) is installed and the saddle stitch function is used.Set the staple position using the "Saddle Fold/Stitch Position Adjust" setting value as the standard.
Specify a value within +/- 3.0 mm in increments of 0.1 mm.
Staple Position Adjustment for Saddle Stitch
This setting is used to adjust both the fold and staple positions when a saddle finisher (50-sheet stapling) installed.Specify a value within +/- 3.0 mm in increments of 0.2 mm.
Disabling of Punch
This setting is used to prohibit the use of punch, such as when the punch module of finisher or saddle finisher malfunctions.Disabling of Folding Unit
This setting is used to disable the folding unit. You can use the saddle folding with the saddle finisher even if the folding unit is disabled.Disabling of Stacker
Setup items may not be displayed depending on which peripherals are installed on this machine.Disabling of Trimming Module
This setting is used to disable the trimming module.Disabling of Stacker 1
This setting is used to disable the primary high capacity stacker.Disabling of Stacker 2
This setting is used to disable the secondary high capacity stacker.Auto Paper Selection Setting
The paper types* that the Auto Paper Selection function will select can be specified. Select one of the following settings:
* The paper type set for each paper tray by selecting [System Settings] in "Setting mode" → [Paper Tray Settings]
- Plain paper
- Plain and recycled paper
- Recycled paper
* The paper type set for each paper tray by selecting [System Settings] in "Setting mode" → [Paper Tray Settings]
Stacker Settings
Stack Setting for Additional Jobs
Specify whether to additionally load paper for new jobs if the stacker tray of the high capacity stacker is already loaded with paper.Auto Switching Setting
When two high capacity stackers are installed, specify whether to output paper to the other high capacity stacker if the current one becomes full.Tandem Connection Setting
When two machines are used as network printers using TCP/IP protocol, use this setting to configure the port number and IP address of the machine used as the tandem slave machine.
Disabling of Master Machine Mode
To prohibit tandem transmission, enable this setting. (Normally this setting is not necessary.)Disabling of Slave Machine Mode
To prohibit tandem reception, enable this setting. (Normally this setting is not necessary.) The factory default setting for the port number is "50001". Unless you experience difficulty with this setting, do not change the port number. To use the tandem function when user authentication is enabled, the same login name and password must be used on both the master machine and slave machine. If the same login name and password are not used, the page count may not be added to the appropriate user count or only the master machine may print.
Double Feed Detection Setting
Select whether to detect double feed.
This is not displayed on the MX-M904.
Document Feeder
Specify whether to detect double feeding from the document feeder.Auto Switching of Finisher Trays
When the Finisher Upper Tray is filled with papers, the output tray is switched to the Lower Output Tray automatically.
If the Finisher Lower Tray is selected for paper output, papers are output to the Finisher Lower Tray only.Optimization of a Hard Disk
Various devices mounted on the machine can be set.
This function optimizes the hard drive of the machine by defragmenting data. If a job is in progress, a message will appear and optimization will not begin until the job is finished. During optimization, the following operations are not possible:
- Access to Setting mode (Web version), and reception of print data
- Use of keys on the operation panel
- Turning off the power with the main power switch of the machine.
- Auto Power Shut-Off
When the document filing function is frequently used and output of files seems somewhat slow, optimizing the hard drive may improve performance.Fusing Cleaning Mode
Use this function to clean the machine's fusing unit when dots or other dirt appear on the printed side of the paper. When this function is executed, "V" printed paper is output and the fusing unit is cleaned.
If improvement is not noticed after the first time you use the function, try executing the function again.MC Cleaning Mode
This machine periodically executes automatic cleaning and normally it is not necessary to execute this mode. Only in case, however, that black or colored lines (linear color unevenness) appear on the printed paper, execute this mode.
- Do not use this function when no black or colored lines appear. Using this function under the normal condition may cause deterioration of the cleaner.
Fusing Control Settings
These are used to control the toner fusing temperature according to the weight of the paper.
These settings apply to plain paper, recycled paper, punched paper, pre-printed paper, letterhead paper, colored paper, and user type paper.
You can select "16 to 23 lbs." or "23+ to 28 lbs." ("60g/m2 to 89g/m2" or "90g/m2 to 105g/m2").
These settings apply to plain paper, recycled paper, punched paper, pre-printed paper, letterhead paper, colored paper, and user type paper.
You can select "16 to 23 lbs." or "23+ to 28 lbs." ("60g/m2 to 89g/m2" or "90g/m2 to 105g/m2").
- Be sure to use only paper that is in the same weight range as the weight range set here. Do not mix plain or other paper that is outside the range with the paper in the tray.
- When settings are changed, the changes will take effect after the machine is restarted. To restart the machine, see "TURNING ON OR OFF THE POWER AND RESTARTING THE MACHINE".
List Print
To specify [One Sided] or [Two Sided] printing in List Print.Black Streak Reduction
Specify to use the black streak reduction or not.
The black streak reduction can be used for Scan Original, Copy, Image Send, and Scan to HDD functions.
If the black streak reduction is enabled, select any of the following options.
The black streak reduction can be used for Scan Original, Copy, Image Send, and Scan to HDD functions.
If the black streak reduction is enabled, select any of the following options.
- Process Black Thin Streaks
- Normal
- Process Black Thin and Thick Streaks
Display warning message for black streaks detection.
Set this option to display a warning message when black streaks are detected by the document feeder.Status Indicator Setting
The status indicator on the back of the machine lights up or blinks according to the status of the machine.
You can change this setting to specify the machine status that causes the green indicator (status indicator) to light up or blink.The indicator goes off when Auto Power Shut-Off is enabled.
Status indicator (green) :You can specify which job status and original scanning status respectively cause the indicator to light up and blink.
Green indicator (Status indicator) :This indicator lights up or blinks when an error occurs on the machine.
Green indicator (Status indicator) lights up and blinks the same way regardless of the pattern you select.
Back to top
You can change this setting to specify the machine status that causes the green indicator (status indicator) to light up or blink.The indicator goes off when Auto Power Shut-Off is enabled.
Status indicator (green) :You can specify which job status and original scanning status respectively cause the indicator to light up and blink.
Green indicator (Status indicator) :This indicator lights up or blinks when an error occurs on the machine.
Green indicator (Status indicator) lights up and blinks the same way regardless of the pattern you select.
| Status | Pattern 1 | Pattern 2 | |
|---|---|---|---|
| Green indicator (Status indicator) | The machine is executing a job. |
Green: Light up |
- |
The machine can accept a job. |
- |
Green: Light up |
|
The machine is scanning an original. |
Green: Blink |
- |
|
The machine is scanning an original/processing data. |
- |
Green: Blink |
|
The machine is in a status other than the above. |
Green: Off |
Green: Off |
|
| Red indicator (Error indicator) | An error has occurred but the machine is able to be operated. |
Red: Light up |
Red: Light up |
An error has occurred and the machine is not able to be operated. |
Red: Blink |
Red: Blink |
|
The machine is in a status other than the above. |
Red: Off |
Red: Off |
|