FAX
ERASING PERIPHERAL SHADOWS ON THE IMAGE
Erase
< steps in all >
 Place the original.
Place the original in the document feeder tray of the automatic document feeder, or on the document glass.
 Enter the destination fax number.
 Tap the [Others >>] key, and tap the [Erase] key.
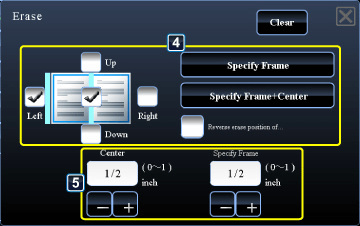
 Tap the checkbox of the edge that you wish to erase, and specify the erase position.
Check that he tapped checkbox is set to  . If the [Specify Frame] key is tapped, the [Up], [Down], [Left], and [Right] checkboxes are set to . If the [Specify Frame+Center] key is tapped, all the checkboxes are set to .
04063001.jpg
Specify the erase edge on the reverse side when erasing edges of one to three sides of Up, Down, Left, and Right on the front side to scan a 2-sided original.
- If the [Reverse erase position of back face.] checkbox is set to , the edge in the position opposite to the erased edge on the front side will be erased.
- If the [Reverse erase position of back face.] checkbox is set to
 , the edge in the same position as on the front side will be erased.
 Specify the erase width.
- Tap the numeric value display indicating the margin shift area on the front side or reverse side, and enter the area using the numeric keys.
- To quickly set the area, first specify a value close to the desired value by the numeric keys, then adjust it with
 .
.
After the settings are completed, tap  .
.
To cancel the erase settings:
Tap the [Clear] key.
Tap the [Clear] key.
 Tap the [Start] key to start scanning of the original.
Tap the [Preview] key to check the preview of an image before sending a fax. For more information, see "CHECKING THE IMAGE TO BE TRANSMITTED".
- A beep will sound to indicate that scanning and transmission have ended.
- If you placed the original on the document glass, scan each page one at a time.
- When scanning finishes, place the next original and tap the [Start] key.
Repeat the procedure until all pages have been scanned and then tap the [Read-End] key.