ERASING PERIPHERAL SHADOWS ON THE IMAGE (ERASE)
Overview
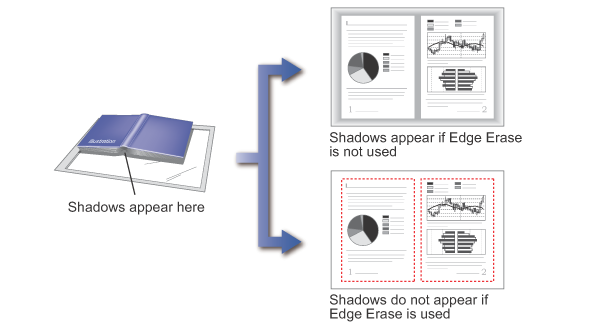
You can erase shadows on images produced when scanning thick originals or books.

Erase modes

 This function erases part of the image where shadows tend to form, but does not detect shadows and erase only the shadows.
 The erase width is synchronized with the zoom ratio setting. For example, if you reduce the size of the original to 70% of its original size after setting the erase width to 1/2" (10 mm), the erase width is set to 3/8" (7 mm).

To change the default erase width setting:
In "Setting mode (administrator)", tap [System Settings] → [Image Send Settings] → [Operation Settings] → [Default Settings] → [Erase Width Adjustment] and change the erase width setting.It can be from 0" to 1" (0 mm to 20 mm). The factory default setting is 1/2" (10 mm).
Operation

Place the original
Place the original in the automatic document feeder or on the document glass.
Enter the destination fax number

Tap the [Others] key, and tap the [Erase] key

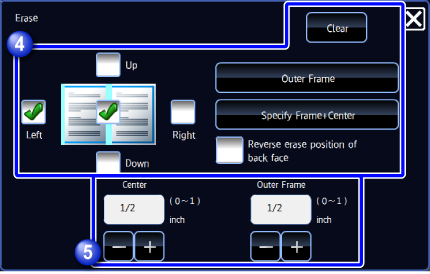
Select an edge that you wish to erase
Check the box of edge you wish to delete so that is displayed.

- [Outer Frame] key: Displays the Up, Down, Left, and Right checkboxes like
 .
. - [Specify Frame + Center] key: Displays all checkboxes like
 .
.
 Specify the erase edge on the reverse side when erasing edges of one to three sides to scan a 2-sided original.
- If you check the [Reverse erase position of back face] box and
 is displayed, the edge in the position opposite to the erased edge on the front side will be erased.
 - If the [Reverse erase position of back face] checkbox is set to
 , the edge in the same position as on the front side will be erased.
- [Outer Frame] key: Displays the Up, Down, Left, and Right checkboxes like

Specify the erase width
Tap the numeric value display indicating the erase width on the front or reverse side, and enter the area using the numeric keys.
To quickly set the area, first specify a value close to the desired value by the numeric keys, then adjust it with .After the settings are completed, tap
 and [Back] keys in sequence.
To cancel the erase setting:
Tap the [Clear] key.
Tap the [Start] key to start scanning of the original
If you inserted the original pages in the document feeder tray, all pages are scanned.
When you place the original on the document glass, scan each page one at a time.
After you have scanned the last original, tap the [Read-End] key.
A beep will sound to indicate that scanning and transmission have ended. Tap the [Preview] key to preview the output image before sending it. After you have scanned an original by tapping the [Preview] key, tap the [Additional Scan] key to scan the next original. Tap the [Start] key to start sending an image.
For more information, see "CHECKING THE OUTPUT IMAGE BEFORE TRANSMISSION".