INSERTING INSERTION SHEETS IN COPIES(COVERS / INSERTS)
Overview
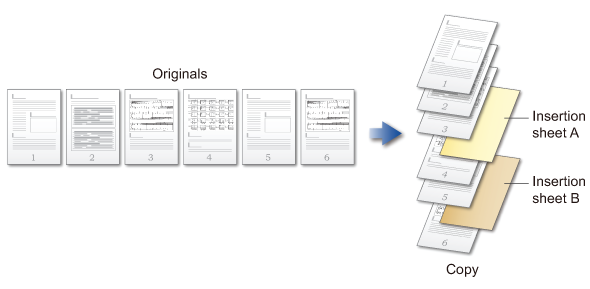
This function inserts a sheet of paper into a specific page as an insertion sheet to make a copy. There are 11 types of insertion sheets.
 When inserting covers, see "INSERTING FRONT AND BACK COVERS INTO COPIES".
Example: Insert A after page 3 and insert B after page 5
Sheet inserting examples
When making a copy also on the insertion sheet, 2-sided copying can be specified for each of the insertion sheet and the paper. The following shows the copy results when an insertion sheet is inserted into the third page of six 1-sided original pages or three 2-sided original pages.
Result of copying a 1-sided original onto the insertion sheet
| Copy to insertion sheet | Paper: 1-sided copy | Paper: 2-sided copy |
|---|---|---|
| Not copied |  Inserts an insertion sheet between the second and third pages of each set of copies. |
 |
| 1-sided copy |  Makes a 1-sided copy of the third original page on an insertion sheet. |
 |
| 2-sided copy |  Makes a 2-sided copy of the third and fourth original pages on an insertion sheet. |
 |
Result of copying 2-sided original to the insertion sheet
| Copy to insertion sheet | Paper: 1-sided copy | Paper: 2-sided copy |
|---|---|---|
| Not copied | Inserts an insertion sheet between the second and third pages of each set of copies. |
|
| 1-sided copy | Makes a 1-sided copy of the third original page on an insertion sheet. |
 *The fourth original page is not copied. |
| 2-sided copy | Makes a 2-sided copy of the third and fourth original pages on an insertion sheet. |
|
- Before using the insertion sheet function, load insertion sheets in the tray.
- First place the originals in the document feeder tray and configure the other copy function settings, and then specify the cover and insertion sheet.
- The insertion sheet size must be the same size as the copy.
- Up to 100 insertion sheets can be inserted.

- The document glass is not available for this function.
- When performing 2-sided copying of 2-sided originals, an insertion sheet cannot be inserted between the front and reverse sides of an original.
- This function cannot be used in combination with the saddle stitch function.
- This setting is not available when the covers/inserts function is disabled in "Setting mode".
Operation

Place the original in the automatic document feeder, and tap the [Preview] key

Tap the [Others] key, and then tap the [Covers/Inserts] key

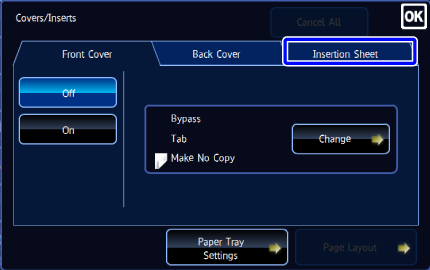
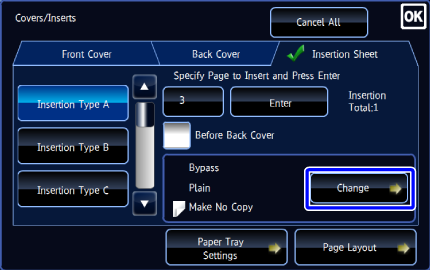
Tap the "Insertion Sheet" tab

Tap the insertion page display key
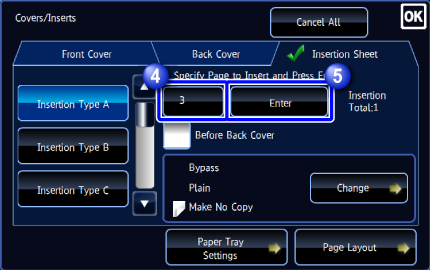

Enter the number of the page you want to insert a sheet into using the numeric keys, and then tap the [Enter] key
The total number of insertion sheets is displayed at the side of [Enter] key. Repeat steps 4 and 5 for the number of insertion sheets.
After the settings are completed, tap and the [Back] key in sequence.
If you have entered an incorrect insertion page number:
Tap the [Page Layout] key and change the page.
To cancel inserting insertion sheets:
Tap the [Cancel All] key.
Tap the [Change] key

When making a copy on insertion sheet A, tap the [Simplex] or [2-Sided Copy] key
When only inserting insertion sheet A, select the [Make No Copy].
After the settings are completed, tap.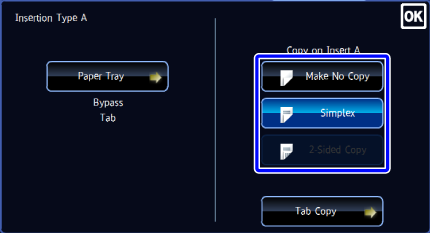
To change an insertion sheet:
Tap the [Paper Tray] key, and select the tray with insertion sheets loaded.
When inserting tab paper, you can make a copy on the tabs of the tab paper. Tap the [Tab Copy] key and adjust the image shift width. For the tab copy settings, see "MAKING A COPY ON TABS OF TAB PAPER (TAB COPY)"
- When copying on both sides of an insertion sheet, you cannot use label sheets or transparency films for insertion. If not copied on, tab paper can be inserted.
- If the paper tray is inserter, the Insertion Sheet cannot be copied on.

Specify the settings for insertion types B through K as required
To specify the settings for any of insertion types B through K, tap the "Insertion Sheet" tab in step 3 before tapping the corresponding key from [Insertion Type B] to [Insertion Type K], and follow steps 4 through 7.
Check the preview image in the preview screen
To cancel all settings:
Tap the [CA] key.
Tap the [Start] key to start copying
To make two or more sets of copies:
Tap the copies display key to specify the number of copies.