CARD SOLUTION KIT
This section explains the settings and login procedure for CAC authentication using the MX-EC50 (Card Solution Kit), and the functions that can be accessed used when using CAC authentication.
SETTING PROCEDURE
To perform authentication using a CAC card, the settings must first be configured in the Web page. (Administrator rights are required.) Configure the settings as explained below.

The settings can also be configured in System Settings on the operation panel. (Administrator rights are required.)
If you need to enter to the System Settings (Administrator) on the operation panel, follow these steps:
- Login to the machine as an administrator to change System Settings on the operation panel when the Card reader is connected.
- In addition to login by tapping the [Admin Login] key, the system settings (administrator) can also be accessed when login is performed by selecting a user with administrator rights from the user list or by entering a user number with administrator rights. For more information on login procedures when user authentication is enabled, see "USER AUTHENTICATION".
- If login will be performed using the CAC card reader, read "LOGIN PROCEDURE WHEN USING CAC AUTHENTICATION".
- To logout...
When you have finished using the machine and are ready to log out, tap [Logout].
User Control Settings
 Go to the machine's Web page by placing the machine's IP address into the browser.
Log in as an administrator.
 Click [User Control], [Authority Group List] in the Web page menu. Then select [Add].
 Create a group name.
Example: "Card Holder Authority"
Select all the proper MFP permissions with the guidance and approval of your network administrator.
Select all the proper MFP permissions with the guidance and approval of your network administrator.
All CAC cardholders will belong to this group and have this specific set of permissions.
 Make sure that "Display only the Files of Logged-in Users" is set to "Allowed", and then click the [Submit] button.
Under [System Settings] tab it is recommended to make sure that the "Clock Adjust" is set to "Prohibited" and then click the [Submit] button.
Make sure that "Display only the Files of Logged-in Users" is set to "Allowed", and then click the [Submit] button.
Under [System Settings] tab it is recommended to make sure that the "Clock Adjust" is set to "Prohibited" and then click the [Submit] button.
 Next click [User Control], [User List] in the Web page menu. Then select [Add].
 Create / Register a card holder user, who has a CAC card.
- Enter a User Name.
Example: "Card Holder" - Enter an Initial.
Example: "CH" - Select the authority group ("Card Holder Authority") as set up in step 3.
- Set the authenticating settings according to the direction of your network administrator.
- Authentication Settings: Normally the authentication is performed locally to the machine, however if administrator requires network authentication (for example LDAP) then "Authentication Settings" needs to change to "Network Authentication". Setup the Network Authentication parameters (for example LDAP).
 Click the [Submit] button to save the settings.
If authentication in the local domain is desired, click [User Control], [CAC Configuration Settings]. Make sure the [Domain User Check] checkbox is selected
Click the [Submit] button to save the settings.
If authentication in the local domain is desired, click [User Control], [CAC Configuration Settings]. Make sure the [Domain User Check] checkbox is selected  Next click [User Control], [Default Settings] in the Web page menu.
 Select user authentication by CAC card.
- Set the "User Authentication" drop down box to "Enable".
- Check [Authenticate a User Common Access Card (CAC)].
- Select the [User Selection] button.
Select the CAC user ("Card Holder") selected in step 6. A pop up window will be displayed. Select [confirmation], then select [OK].
 Click the [Submit] button.
You can easily set up the User Registration and Authority Group Registration in User Control Settings by importing the Sample User Registration File ("Sample.bin" file). See your Instruction Guide for details.
Click the [Submit] button.
You can easily set up the User Registration and Authority Group Registration in User Control Settings by importing the Sample User Registration File ("Sample.bin" file). See your Instruction Guide for details.
Device Account mode setting
These steps will help users to setup the CAC authentication and allow non CAC users to perform some functions such as Copy and Print only and block scanning. (Skip these steps if only users with CAC card can access all MFP functions.)
Create another Authority group name.
Example: "Site Guest Authority".
Set the proper privileges. To prevent non CAC users from scanning, change the related items to "Prohibited" as shown.
Image Send
Set the proper privileges. To prevent non CAC users from scanning, change the related items to "Prohibited" as shown.
Image Send
- E-mail: Prohibited
- FTP: Prohibited
- Desktop: Prohibited
- Network Folder: Prohibited
- USB Memory: Prohibited
- PC Scan: Prohibited
- Internet Fax Send: Prohibited
- PC-I-Fax Send: Prohibited
Make sure that "Display only the Files of Logged-in Users" is set to "Allowed", and then click the [Submit] button.
Under [System Settings] tab it is recommended to make sure that the "Clock Adjust" is set to "Prohibited" and then click the [Submit] button.
Next click [User Control], [User List] in the Web page menu. Then select [Add].
Create / Register a site guest who doesn't have a CAC card.
- Enter a User Name.
Example: "Site Guest" - Enter an Initial.
Example: "SG" - Select the authority group ("Site Guest Authority") as set up in step 1.
Click the [Submit] button to save the settings.
Next click [User Control], [Default Settings] in the Web page menu.
Set the "Device Account Mode Setting".
- Set the "User Authentication" drop down box to "Enable".
- Check [Authenticate a User Common Access Card (CAC)].
- Check the "Device Account Mode" and "Allow login by Default User".
- Select the [User Selection] button.
Select the CAC user ("Site Guest") selected in step 4.
A pop up window will be displayed. Select [confirmation],then select [OK].
Click the [Submit] button.
You can easily set up the User Registration and Authority Group Registration in the Device Access Mode setting by importing the Sample User Registration File ("Sample.bin" file). See your Instruction Guide for details.
Including the user name in the file name
The user name registered in the CAC card can be added to the scanned file name.
To configure this setting, select [Application Settings] → [Network Scanner Settings] → [Administration Settings] in the Web page menu, and select "File Naming" on the [Administration Settings] page. (Administrator rights are required)
When "Sender Name" is enabled in "File Naming", the user name of the CAC card is set in "Sender Name" automatically. (All user name characters before the @ from user e-mail address).
"E-mail to Self only" and "Allow Site E-mail Address"
Specify whether "Scan to Self" and "Scan to Site" are enabled.
To configure these settings, select [System Settings] → [Image Send Settings] → [Scan settings] → [E-mail Setting] in the Web page menu (Administrator rights are required).
Enter an E-mail address for "Scan to Site" (maximum of 64 characters). If LDAP is set, click the [Global Address Search] button to select the proper address.
Settings
| E-mail to Self Only | Specify whether or not "Scan to Self" is enabled. |
|---|---|
| Allow Site E-mail Address | Specify whether or not "Scan to Site" is enabled. This setting can only be enabled when an LDAP server has been registered and "E-mail to Self Only" is enabled. |
When "E-mail to Self Only" is enabled, or "E-mail to Self Only" and "Allow Site E-mail Address" are enabled, the selection of addresses from the address book and direct entry of addresses are not possible. The only image send functions that can be used are "Scan to Self" and "Scan to Site".In this case, the following items do not function, regardless of whether or not they are enabled:
- Disable Scan Function: PC Scan, USB Memory Scan
- Default Address Setting
- Settings to Disable Registration: Disable Registration of Program
- Settings to Disable Transmission: Disable Selection From Address Book, Disable Direct Entry. PC Internet Fax and PC-Fax can be used when CAC authentication is used. To disable PC Internet Fax or PC-Fax, use "Settings to Disable Transmission" in the system settings (administrator).
Sign / Encrypt E-mail Setting
Settings for [Sign E-mail] (appending an e-mail signature to e-mail messages) and [Encrypt E-mail] (encrypting e-mail messages) can be selected.
To configure these settings, select [System Settings] → [Image Send Settings] → [Scan settings] → [E-mail Setting] in the Web page menu. (Administrator rights are required.)
To configure these settings, select [System Settings] → [Image Send Settings] → [Scan settings] → [E-mail Setting] in the Web page menu. (Administrator rights are required.)
Settings
| Sign / Encrypt E-mail Setting |
Specify whether or not "Sign E-mail" and "Encrypt E-mail" are always performed.
|
|---|---|
| Policy for E-mail Encryption Operation |
Specify conditions for transmission of encrypted e-mail.
|
| Encryption Algorithm | Select the algorithm that is used for e-mail encryption. The e-mail will be encrypted using "AES256", "AES128", or "3DES", whichever algorithm is specified. When a signature is appended or the e-mail is encrypted, the maximum allowed number of recipients may decrease. |
CAC Configuration Settings
Specify CAC related configuration settings.
To configure these settings, select [User Control] → [CAC Configuration Settings] in the Web page menu. (Administrator rights are required.)
To configure these settings, select [User Control] → [CAC Configuration Settings] in the Web page menu. (Administrator rights are required.)
Settings
| Authentication Option |
Specify whether or not authentication by domain server is used for CAC authentication.
|
|---|---|
| Certificate Validation Option | Specify whether or not the user certificate is validated by the specified OCSP server. |
| Combo Card Option | Select CAC or PIV for the card that is used. |
| Force Retention | Specify whether or not all the printing jobs are always held in the Document Filing folder. |
Procedures for configuring PKI and OCSP
Follow the steps below to configure PKI authentication.
Install all certificates in the trust chain of the CA certificate that issued the user certificate.
- On your computer, prepare the certificate file that you wish to install.
- Click the [Import] button in "Security Settings" → [CAC Certificate Management] in the Web page menu.
- Select the certificate file that you wish to install and click the [Execute] button.
Configure the Kerberos server settings to perform PKI certificate authentication. (Kerberos must be setup to perform PKI certificate authentication.)
- Open "Network Settings" → [Service Settings] → [Kerberos] in the Web page menu.
- Set the "KDC Server", "Port Number", and "Realm".
Adjust the machine time and Kerberos server time.
Select "Clock Adjust" from "System Settings" → [Default Settings] in the Web page menu, and set the correct time and time zone.
Follow the steps below to configure OCSP validation.
Install all certificates in the trust chain of the CA certificate that issued the user certificate.
- On your computer, prepare the certificate file that you wish to install.
- Click the [Import] button in "Security Settings" → [CAC Certificate Management] in the Web page menu.
- Select the certificate file that you wish to install and click the [Execute] button.
Up to 20 certificates can be imported.
Install all certificates in the trust chain of CA certificate which issued the OCSP signature certificate.
Follow the procedure in Step 1 to install the OCSP signature certificate.
Set the URL of the OCSP responder.
Set the OCSP Server Service URL in "Security Settings" → [OCSP Settings] in the Web page menu.
For example: http://ocsp.example.com/
For example: http://ocsp.example.com/
Up to three OCSP responder URLs can be set.
Confidential Printing
When "Force Retention" is enabled in the CAC configuration settings with the DSK and CAC option installed, all the "Sharing Mode" settings except for Printer are checked (Disabled) as a default value in "Disabling of Document Filing", which appears after selecting [Security Settings] → [System Settings] in the Web page menu. (Administrator rights are required.). Make sure that the "Sharing Mode" setting for Printer is still unchecked (enabled), in order to store jobs other than jobs with a password to the Main Folder.
LOGIN PROCEDURE WHEN USING CAC AUTHENTICATION
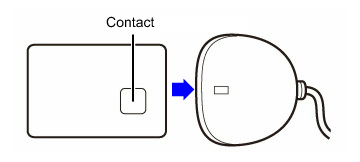
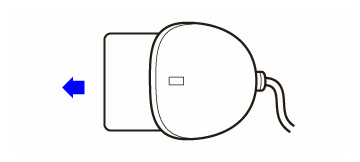
A peripheral CAC card reader (MX-EC50) can be installed to perform user authentication by CAC card (Common Access Card). Make sure that the CAC card reader is correctly connected to the machine and then perform authentication.
When authentication is initiated using the CAC card reader, the following login screens appear:
When Device Account Mode is not used, or when only Card Holder can access MFP.
The above login screen will appear to let you perform the login procedure. Users with a CAC card should insert their card to login.
When Device Account Mode is used, or when Card Holder and Site Guest can access the MFP.
Users with a CAC card should insert their card to login. Users without a CAC should tap the  . The usual base screen will appear, however, the functions that can be used are restricted (depending on the machine / group settings).
- To use authentication by CAC card, consult your dealer or nearest SHARP Service Department.
- If users without a CAC are permitted to use the multifunction machine in the system settings, a message screen will appear upon selecting a function, which is not permitted.
Users should tap the [Login] key. The above login screen will appear to let you perform the login procedure. Users without a CAC should tap the. The usual base screen will appear, however, the functions that can be used are restricted in the system settings. - When "Display only the Files of Logged-in Users" is set to "Allowed", no files appear in the Document Filing folder without logging in. Make sure you login before going to Document Filing folder.

-
System Settings (Administrator): User Authentication
This specifies whether or not CAC card authentication is used. To configure this setting, click [User Control] and then [Default Settings] in the Web page menu. (Administrator rights are required.)
For details, see "User Control Settings" . -
System Settings (Administrator): CAC Configuration Settings
This sets the CAC card authentication method. To configure this setting, select [User Control] → [User Count] → [CAC Configuration Settings] in the Web page menu. (Administrator rights are required.)
For details, see "CAC Configuration Settings" .
Login by CAC card
Make sure that the CAC card reader is correctly connected to the machine and then perform authentication.
Insert the CAC card into the CAC card reader.
Insert the card with the contact facing up.
 Enter the password for the CAC card, then tap the [OK] key.
After the message "Authentication in progress. Please wait." appears, login is completed.
-
If you enter an incorrect password…If you enter an incorrect password three times in a row, password entry using that CAC card will not be possible.
Contact the administrator of the machine.
The CAC card will become locked if the correct password is not entered usually after 3 attempts. (The 3 attempts are part of the Card functionality not the MFP. For the exact number of attempts please consult your administrator). -
To perform authentication using an LDAP server…If user authentication is performed by network authentication using an LDAP server or directory service (Active Directory, etc.), domain server authentication can be performed based on the information in the card. LDAP authentication can be used if an LDAP service is provided on your LAN (local area network) by your server administrator.
To perform authentication using an LDAP server, the LDAP server used for authentication must be set in the system settings (administrator). - To store, change, or delete a root certificate used for LDAP server or PKI server authentication, click [Security Settings] → [Certificate Management] in the Web page menu. (Administrator rights are required.) To import a file, use the [Import] button.
- For the procedure for entering text, see "NAMES AND FUNCTIONS OF SOFT KEYBOARD KEYS" .
 To return to the login screen without performing CAC card authentication, tap the
-
System Settings (Administrator): Perform LDAP server access controlSet the LDAP server that is used when authentication using an LDAP server is performed.
To configure this setting, select [User Control] → [Various Settings] in the Web page menu. (Administrator rights are required.) -
System Settings (Administrator): CAC Configuration SettingSpecify whether or not "Domain User Check" and "PKI Certificate Check" are performed. To configure these settings, select [User Control] → [User Count] → [CAC Configuration Settings] in the Web page menu. (Administrator rights are required.)
For details, see "CAC Configuration Settings" .
When you have finished using the machine, tap [Logout] or just remove the CAC card.
If a preset duration of time elapses after the machine is last used, the Auto Clear function will activate. When Auto Clear activates, logout takes place automatically.
Remove the CAC card from the CAC card reader.
MACHINE FUNCTIONS WHEN CAC AUTHENTICATION IS USED
Printing
When CAC authentication is used and "Force Retention" in the CAC configuration settings is enabled, all print jobs are held. Enter your CAC user name (Use all characters (up to 32 characters) before the @ from your e-mail address) in "User Name" field of "Default Job ID".
When the job is sent to the Printer, the Job can be retrieved after logging in.
To select the job, follow the steps below.
When the job is sent to the Printer, the Job can be retrieved after logging in.
To select the job, follow the steps below.
Tap the [HDD File retrieve].
Tap the key of the folder that contains the desired file.
Select the file to print from the folder where the job was sent.
When "Display only the Files of Logged-in Users" is set to "Allowed", no files appear in the Document Filing folder without login. So, please make sure your login before going to Document Filing folder in case of Device Account Mode.
Image Send
When CAC authentication is used, you can select any scan function as in normal scan operation. For details, see the Operation Guide, "SENDING AN IMAGE IN SCAN MODE" .
However if "Scan to Self" or "Scan to Site" function was set by the administrator, regular image send functions (fax mode, USB memory mode, Internet fax mode, PC scan mode, data entry mode) are disabled.
The functions below are enabled.
Scan to Self: Send scanned data only to the e-mail address registered in the CAC card.
Scan to Site: Send scanned data only to the e-mail address specified by the administrator.
System Settings (Administrator): E-mail Setting
Specify whether or not "Scan to Self" and "Scan to Site" are enabled. Enter an e-mail address for "Scan to Site". To configure this setting, select [System Settings] → [Image Send Settings] → [Scan settings] → [E-mail Setting] in the Web page menu. (Administrator rights are required.) For details, see ""E-mail to Self only" and "Allow Site E-mail Address"" .
If the "Sign E-mail" and/or "Encrypt E-mail" functions were enabled, an electronic signature can be appended and the e-mail can be encrypted.
Sign E-mail: Append an e-mail signature to e-mail messages.
Encrypt E-mail: Encrypt e-mail messages.
Sign E-mail: Append an e-mail signature to e-mail messages.
Encrypt E-mail: Encrypt e-mail messages.
System Settings (Administrator): Sign / Encrypt E-mail Setting
Specify whether or not "Sign E-mail" and "Encrypt E-mail" are enabled. To configure these settings, select [System Settings] → [Image Send Settings] → [Scan settings] → [E-mail setting] in the Web page menu. (Administrator rights are required.) For details, see "Sign / Encrypt E-mail Setting".
Scan Mode Base Screen (limited function)
When "Scan to Self" or "Scan to Site" is enabled, the base screen will change as indicated below.

- (1) Message area
-
This shows the send mode and destination address.
When "Scan to Self" is used: My E-mail Address
When "Scan to Site" is used: Site E-mail Address - (2) [Sign E-mail] key
-
Tap to enable Sign E-mail. If "Sign E-mail" is enabled in "Sign / Encrypt E-mail Setting", this is fixed in the selected state.
Sign / Encrypt E-mail Setting - (3) [Encrypt E-mail] key
-
Tap to enable Encrypt E-mail. If "Encrypt E-mail" is enabled in "Sign / Encrypt E-mail Setting", this is fixed in the selected state.
Sign / Encrypt E-mail Setting - (4) [Address Change] key
-
Use this to switch between the "Scan to Self" and "Scan to Site" e-mail addresses.
The Encrypt E-mail setting for an address cannot be changed to ON once it has been specified as a destination, while the Sign E-mail can. When the Encrypt E-mail setting is changed to ON after it has been specified as a destination, a message will appear to ask if specified destination(s) may be canceled.
Address Review screen (when "Sign E-mail" and "Encrypt E-mail" are enabled)
Tap the [Confirm Address] key on the action panel.
When "Sign E-mail" and "Encrypt E-mail" are enabled, addresses specified as destinations can be checked by means of icons in the Address Review screen.
Address for which only Sign E-mail is enabled:
Address for which only Encrypt E-mail is enabled:
Address for which both Sign E-mail and Encrypt E-mail are enabled:
Document Filling
This section describes Document Filing functions only related to CAC authentication. For other details about the Document Filing function, see "DOCUMENT FILING".
Operation when CAC authentication is used
When CAC authentication is used and "Force Retention" in the CAC configuration settings is enabled, all print jobs are stored in the main folder.
When CAC authentication is used, "Main Folder", "Quick File Folder", and "Custom Folder" can be selected as usual; however, when a folder or file is selected or a file is manipulated, you can choose to have only folders and files of the login user be displayed.
If you wish to have only folders and files of the login user be displayed, change "Display only the files of Logged-in Users" to "Allowed". (When the CAC option is installed, the default value is changed to "Allowed".) To configure this setting, click [User Control] → [Authority Group List] and then click [Add] in the Web page menu. (Administrator rights are required.) For details, see "SETTING PROCEDURE".
If you log in as an administrator, all jobs appear.
File selection
Only files of the login user appear. This also applies to the multi-file print screen. When "Batch Print" is selected in the multi-file print screen, the user name is fixed at the login user.
BASE SCREEN OF DOCUMENT FILING MODE
MULTI-FILE PRINTING
File search
The user name is automatically set to the user that is logged in. The user name is fixed and cannot be selected.
FILE SEARCH AND RETRIEVAL
File manipulation
When "Scan to Self" or "Scan to Site" is enabled in "E-mail Setting" in the system settings (administrator), the only option that can be used when "Send" is selected for the operation is "Scan to Self" or "Scan to Site".
Image Send
Manipulating jobs in the job status screen
When CAC authentication is used, only the jobs of the currently logged in user can be manipulated.
Other Notes
This section explains other settings that are useful for CAC authentication and procedures for deleting user information.
LDAP and SMTP
| SMTP and Kerberos | To configure this setting, select [Network Settings] → [Service Settings] in the Web page menu. |
|---|---|
| LDAP | To configure this setting, select [Network Settings] → [LDAP Settings] in the Web page menu. |
| LDAP-Global address book | To configure this setting, select [Network Settings] → [General Settings] in the Web page menu |
To Control Ports (Disable/Enable ports)
To configure this setting, select [Security Settings] → [Port Control] in the Web page menu.
Clearing all Data
If you need to clear all memory and saved files for example at the end of life please follow these steps:
Back to top
- Log in as an administrator.
- Select [System settings].
- Select [Data Clearing Settings].
- Select all these 4 operations one by one: [Clear All Memory], [Clear Document Filing Data], [Clear All Data In Jobs Completed List], and [Clear Address Book and Registered Data].