SENDING AN IMAGE IN SCAN MODE
Overview
An image can be sent in scan mode (Scan to E-mail, Scan to FTP, Scan to Desktop, and Scan to Network Folder).

- If the memory becomes full while the originals are being scanned, a message will appear and scanning will stop.
- When performing Scan to E-mail, take care not to send a file that is too large. In particular, multi-page files tend to be large. When sending a multi-page file or other large file, it may be necessary to reduce the number of scanned pages or reduce the send size.
 Do not place any objects under the original size detector. Closing the automatic document feeder with an object underneath may damage the original size detector plate and prevent correct detection of the document size.
Operation
 Place the original.
Place the original in the document feeder tray of the automatic document feeder, or on the document glass.
- When placing the originals, orient them as shown below.
-2.jpg)
- *To place a large portrait-oriented original, place it as shown in the figure titled "Landscape orientation" and specify the placement orientation in step 5.
- Place 5-1/2" x 8-1/2" (A5) size originals in portrait (vertical) orientation (
 ). If placed in landscape (horizontal) orientation (
 ), an incorrect size will be detected. For an 5-1/2" x 8-1/2"R (A5R) size original, enter the original size manually.
 Specify the destination.
The icon on the key indicates the type of destination stored in the key.
 : Scan to E-mail
 : Scan to FTP
 : Scan to Network Folder
 : Scan to Desktop
- After a one-touch key is tapped, if the screen is changed without tapping
 , the destination of the tapped key is automatically specified.
 - When performing Scan to E-mail, you can also send Cc or Bcc copies to other destinations. Tap
 to select destinations.
 - Multiple destinations can be specified.
- To change [Subject], [File Name], [Reply Name], or [Body Text], tap a target entry box, or tap [Options].
- Change the subject, file name, reply name, or mail text at scan transmission.
 Tap the [Original] key.
 Tap the appropriate orientation key.
Specify the orientation of the original placed in step 1.
After the settings are completed, tap 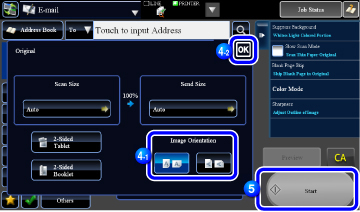
- You can change exposure, resolution, file format, color mode, and other settings. Tap their keys.
- AUTOMATICALLY SCANNING BOTH SIDES OF AN ORIGINAL (2-SIDED ORIGINAL)
- SCAN SIZE AND SEND SIZE (ENLARGE/REDUCE)
- CHANGING THE EXPOSURE AND ORIGINAL IMAGE TYPE
- CHANGING THE RESOLUTION
- CHANGING FORMAT IN SCAN OR DATA ENTRY MODE
- CHANGING COLOR MODE
- Tapping the [Others] key allows you to configure various functions, for example, collectively sending two original pages as one sheet or original pages with different sizes.
 Tap the [Start] key to start scanning of the original.
Tap the [Preview] key to check the preview of an image before sending the original.
Tap the [Start] key to start scanning of the original.
Tap the [Preview] key to check the preview of an image before sending the original.
- If the original was inserted in the document feeder tray, a beep will sound when scanning is completed and transmission will take place.
- If the original is placed on the document glass, the [Read-End] key appears in the touch panel. If the original is only one page, go to step 7. To scan more pages, go to step 6.
If the file format is set to [PDF/Encrypt], [PDF/Encrypt/Emphasize Black Letter], [PDF/Encrypt/High Compression], or [PDF/Encrypt/High Compression/Ultra Fine], you will be prompted to enter the password when you tap the [Start] key.Tap the [Entry] key to open the keyboard screen, enter a password using a maximum of 32 characters, and tap the [OK] key. The recipient must use the password entered here to open the Encrypt PDF file.
To cancel Encrypt PDF, tap the [Cancel] key. The format settings screen will appear to let you change the file type.
Select a new file type and tap the [Start] key to begin transmission.
 If the original was placed on the document glass, replace it with the next original and tap the [Start] key.
Repeat until all originals have been scanned.
 Tap the [Read-End] key.
A beep will sound to indicate that the operation is completed.
- If no action is taken for one minute after the confirmation screen is displayed, scanning automatically ends and the transmission is reserved.
- Tap the [Change Setting] key to change the exposure, resolution, scan size, and send size for each original page scanned. However, when "Card Shot" is selected in Others, change only the exposure when scanning an even-numbered original page.