SENDING THE SAME FAX TO MULTIPLE DESTINATIONS (BROADCASTING)
Overview
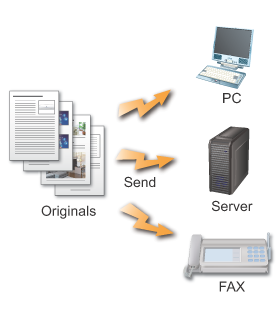
You can send the same scanned image to Scanner mode, Internet Fax mode, and Fax mode destinations in a single operation. This is called the "broadcasting".
You can transmit to as many as 500 destinations in one broadcast operation.
You can transmit to as many as 500 destinations in one broadcast operation.

- If the original is in color and the color mode is set to "Full Color", the original is sent in Mono2 to Internet fax or fax mode destinations.
- A long original is sent in black and white.
- Various fax destinations can be specified together. If the [Send Same Image as Fax Address] checkbox ([Send Same Image as I-Fax Address] checkbox when only Internet Fax expansion kit has been installed) is set to
 , the same image as that sent by the fax is sent even to the destination which supports the color transmission, such as the Scan to E-mail function.
 If a Scan to FTP or Network Folder address is specified, you cannot use the hyperlink e-mail transmission.
To register destinations in a contact or group:
In the base screen or address book screen, tap the [Register/Edit Address] key on the action panel, or tap the [Address Control] icon on the home screen. For details, see "STORING ADDRESSES THROUGH DIRECT ENTRY", "STORING ADDRESSES THROUGH GLOBAL ADDRESS SEARCH", "STORING ADDRESSES FROM FAX OR IMAGE SEND LOGS" or "STORING GROUPS".Tips on using the broadcasting
It is convenient to store destinations you frequently use for broadcast transmission as contacts or groups. Maximum of 500 destinations can be stored in a contact or group.
Tapping the one-touch key for a registered group allows you to retrieve multiple contacts at once.
For contacts, set the [Set as Default used] checkbox to for multiple fax numbers, and you can retrieve them by simply touching the key. If you select [System Settings] in "Setting mode (administrator)" → [Image Send Settings] → [Operation Settings] → [Default Settings] → [Address Book Default Selection] and if you set the [Apply Addresses of Sending Modes Only] checkbox is set to (factory default), only the destination of the currently selected mode is called among the destinations being set by [Set as Default used]. However, if this checkbox is set to  , you can call a destination of another mode as well.
Tapping the one-touch key for a registered group allows you to retrieve multiple contacts at once.
For contacts, set the [Set as Default used] checkbox to
- STORING ADDRESSES THROUGH DIRECT ENTRY
- STORING ADDRESSES THROUGH GLOBAL ADDRESS SEARCH
- STORING ADDRESSES FROM FAX OR IMAGE SEND LOGS
- STORING GROUPS
If you select [System Settings] in "Setting mode (administrator)" → [Image Send Settings] → [Operation Settings] → [Default Settings] → [Address Book Default Selection] and if you set the [Apply Addresses of Sending Modes Only] checkbox is set to Operation

Place the original
Place the original in the automatic document feeder or on the document glass.
Specify all destinations
- SPECIFYING A DESTINATION FROM THE ADDRESS BOOK
- SPECIFYING A DESTINATION USING THE SEARCH NUMBER
- ENTER A DESTINATION MANUALLY
- SPECIFYING A DESTINATION FROM THE GLOBAL ADDRESS BOOK
- SPECIFYING A DESTINATION FROM TRANSMISSION LOG
- To switch delivery types (To/Cc/Bcc), tap
 .
.  can be omitted before or after a destination entered using a one-touch key.
If "Must Input Next Address Key at Broadcast Setting" is enabled in "Setting mode", tap before specifying the next destination.- If the [Send Same Image as Fax Address] checkbox([Send Same Image as I-Fax Address] checkbox when only Internet Fax expansion kit has been installed) is set to , the same image as that sent by the fax is sent even to the destination which supports the color transmission, such as the Scan to E-mail function.
- One-touch keys that cannot be used for broadcast transmission are grayed out to prevent selection.
- If a Scan to FTP or Network Folder address is specified, you cannot use the hyperlink e-mail transmission.

Tap the [Confirm Address] key on the action panel
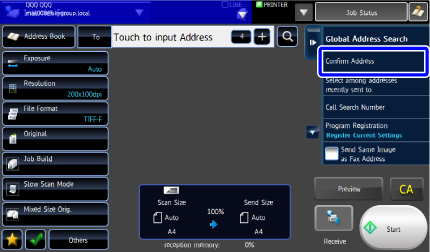

Confirm the destination

 To cancel the specified destination
Tap the one-touch key of the destination that you wish to cancel, and tap the [Delete] key on the action panel.
Tap the [Start] key to start scanning of the original
If you inserted the original pages in the document feeder tray, all pages are scanned.
When you place the original on the document glass, scan each page one at a time.
After you have scanned the last original, tap the [Read-End] key.
A beep will sound to indicate that scanning and transmission have ended. Tap the [Preview] key to preview the output image before sending a fax. After you have scanned an original by tapping the [Preview] key, tap the [Additional Scan] key to scan the next original. Tap the [Start] key to start sending an image.
For more information, see "CHECKING THE OUTPUT IMAGE BEFORE TRANSMISSION".