ERASING PERIPHERAL SHADOWS ON THE IMAGE(ERASE)
Overview
When scanning thick originals or books, erase any peripheral shadows that may be produced on the image.
 This function erases the parts of the image where shadows tend to form, but does not detect shadows and erase only the shadows.
Scanning a thick book
_1.jpg)
| Not using the erase function | Using the erase function |
|---|---|
_2.jpg) Shadows appear in the image. |
_3.jpg) No shadows appear. |
Erase modes

 If a ratio setting is used in combination with an erase setting, the erase width will change according to the selected ratio.
This function erases the parts of the image where shadows tend to form, but does not detect shadows and erase only the shadows.
For example, if you set an erase width of 1/2" (10 mm) and reduce the image to 70% before scanning it, the erase width will be reduced to 7 mm.

To change the default erase width setting:
In "Setting mode", select [System Settings] → [Image Send Settings] → [Operation Settings] → [Default Settings] → [Erase Width Adjustment].The width can be set from 0" to 1" (0 mm to 20 mm). The factory default setting is 1/2" (10 mm). The setting changed here will apply to [System Settings] → [Copy Settings] → [Copy Setting] → [Erase Width Adjustment] in "Setting mode".
Operation
 Place the original.
Place the original in the document feeder tray of the automatic document feeder, or on the document glass.
 Specify the destination.
 Tap the [Others] key, and tap the [Erase] key.
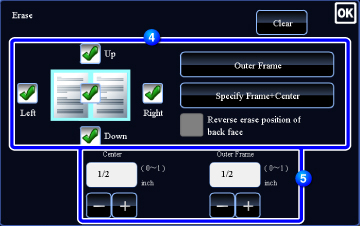
  Tap the checkbox of the edge that you wish to erase, and specify the erase position.
Check that he tapped checkbox is set to  .
.
If the [Specify Frame] key is tapped, the [Up], [Down], [Left], and [Right] checkboxes are set to .
.
If the [Specify Frame+Center] key is tapped, all the checkboxes are set to .
.
If the [Specify Frame] key is tapped, the [Up], [Down], [Left], and [Right] checkboxes are set to
If the [Specify Frame+Center] key is tapped, all the checkboxes are set to

 Specify the erase edge on the reverse side when erasing edges of one to three sides of Up, Down, Left, and Right on the front side to scan a 2-sided original.
- If the [Reverse erase position of back face.] checkbox is set to
 , the edge in the position opposite to the erased edge on the front side will be erased.
 - If the [Reverse erase position of back face.] checkbox is set to
 , the edge in the same position as on the front side will be erased.
 Specify the erase width.

- Tap the numeric value display indicating the margin shift area on the front side or reverse side, and enter the area using the numeric keys.
- To quickly set the area, first specify a value close to the desired value by the numeric keys, then adjust it with
 .
.
After the settings are completed, tap  .
.
 To cancel the erase settings:
Tap the [Clear] key.
 Tap the [Start] key to start scanning of the original.
 Tap the [Preview] key to check the preview of an image before sending a fax. For more information, see "CHECKING THE IMAGE TO BE TRANSMITTED".
- If you inserted the original pages in the document feeder tray, all pages are scanned.
A beep will sound to indicate that scanning and transmission have ended. - If you placed the original on the document glass, scan each page one at a time.
When scanning finishes, place the next original and tap the [Start] key.
Repeat until all pages have been scanned and then tap the [Read-End] key.
A beep will sound to indicate that transmission has ended.